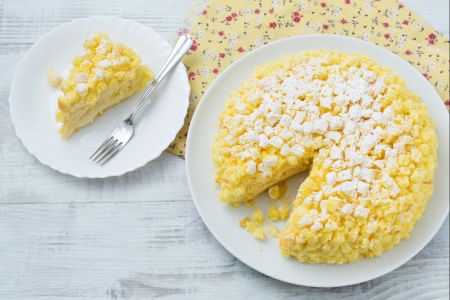
Classic mimosa cake (Cake covered with sponge cake cubes)
Classic mimosa cake (cake covered with sponge cake cubes) features decorations reminiscent of mimosa flowers, making it the perfect dessert to…
- Difficult
- 1 h 30 min
- Kcal 519
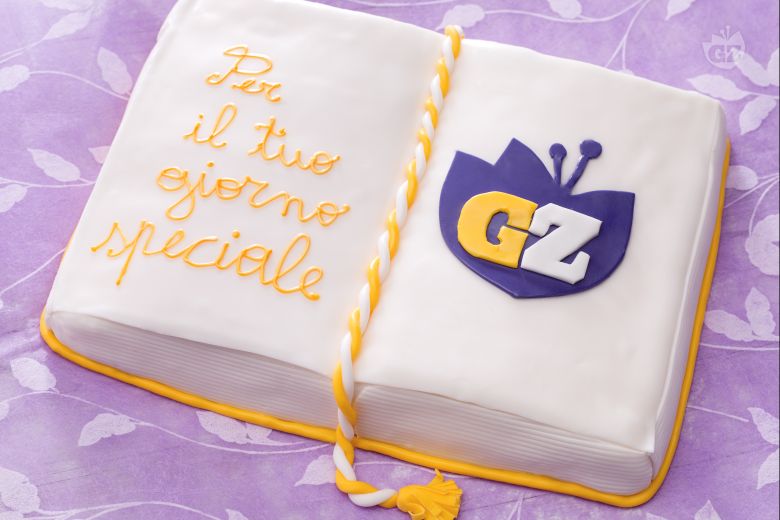
The book cake, or torta libro, is something super special you’d spot at Italian celebrations. It's not just a dessert; it’s an edible canvas for personal messages and heartfelt dedications. Made with the classic Italian sponge, pan di spagna, it’s turned into a book-shaped cake that tells a story with every bite. Perfect for graduations, first communions, or just to show some love, it's more than a sweet treat. Really, it is. Each forkful gives you a tender and moist experience, with layers of delicate pastry cream inside. And listen, the filling can vary with chocolate or fruit options making each book cake unique.
In places like Sicily or Milan, families often add a special touch, sometimes a splash of liqueur in the syrup that soaks the sponge—enhancing those flavors even more. Italian pastry shops focus as much on the emotion and message as on the look of the book cake. Bakers really spend extra time on decoration, crafting golden covers and piping heartfelt messages that make each cake personal.
There’s something so sweet and magical about seeing someone’s face light up when they read the dedication on their cake. A book cake tutorial often encourages creativity, suggesting colors or edible paints for extra flair. You know, this dessert suits many occasions, and no two are the same. Those who love themed cakes or are searching for new book cake ideas can always find inspiration in the Italian way—simple, heartfelt, and full of flavor. So... Next time you want to surprise someone and really really make a moment, this creamy and original cake will surely melt hearts and create lasting memories. Honestly, it will.
You might also like:
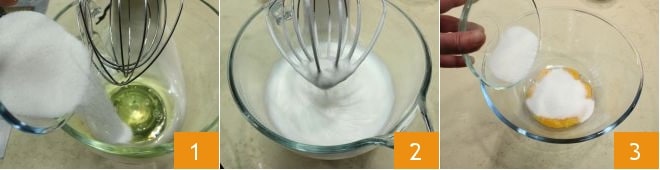
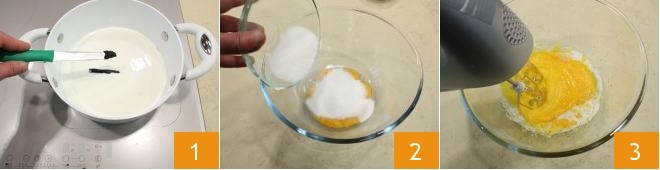
To prepare the book cake, start by making the Sponge cake using the cold separation method. Take the eggs, which should be at room temperature, and carefully separate the yolks from the whites. Place the egg whites in the bowl of a stand mixer and add about 1/3 of the sugar 1 and begin to beat them at medium speed until they are glossy 2, but not stiff. You will obtain a foamy mixture, not clumpy; set it aside and in the meantime, add the remaining sugar to the yolks 3.
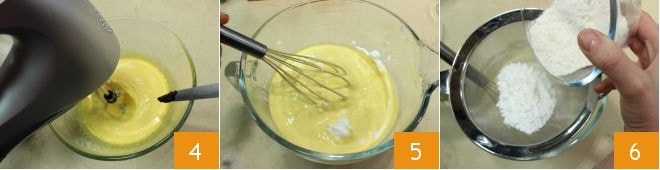
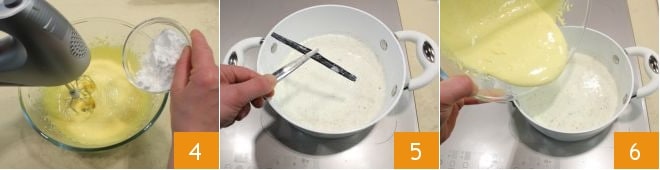
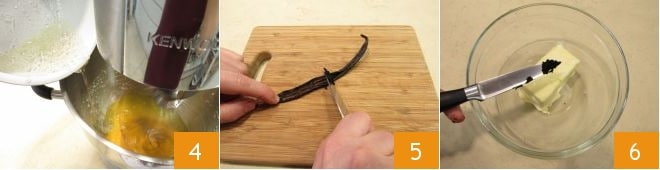
Begin to beat these as well, using a mixer, and once you have obtained a foamy mixture with good aeration and a light yellow color, add the seeds from the vanilla bean 4 (to extract them, you will need to cut and scrape the bean with a knife) and stop the machine. Gently fold the beaten yolks into the egg whites and mix with a whisk 5 (or a spatula) from bottom to top to avoid deflating the mixture. At this point, sift the flour and cornstarch 6 directly onto the mixture,
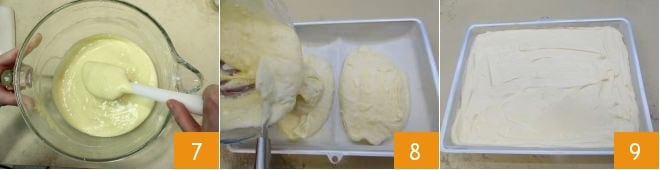
and using a spatula, gently combine all the ingredients 7. Butter and flour the appropriate baking pan, with dimensions of 14x11 inches, pour in the mixture 8, and level the surface with a spatula 9.
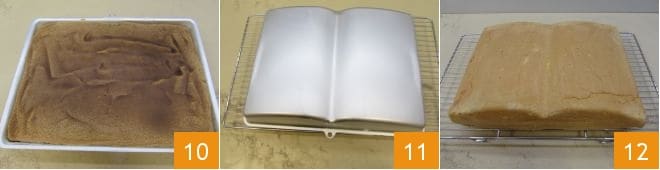
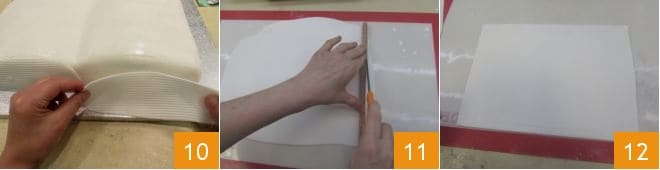
Bake in a preheated static oven at 356°F for 60-70 minutes (320°F for about 50-60 minutes if using a fan oven). Once baked 10, let it cool in the pan, then flip it 11, remove it from the pan, and let it cool completely on a wire rack 12.
While the cake is baking, make the Pastry cream. Combine the milk and cream in a large saucepan and place it over the heat. Cut the vanilla bean with a knife, extract the seeds, and add them along with the bean to the pan with milk and cream 1. Bring almost to a boil, then turn off the heat and let it infuse for 5 minutes. Meanwhile, separate the egg whites from the yolks and gather the yolks in a large bowl. Pour the sugar 2 into the bowl with the yolks and beat with an electric mixer 3 or by hand until you have a fluffy and foamy cream.
While continuing to beat, also add the cornstarch 4. Remove the vanilla bean from the milk and cream mixture 5 and, quickly mixing with a whisk, add the prepared egg and starch mixture 6.
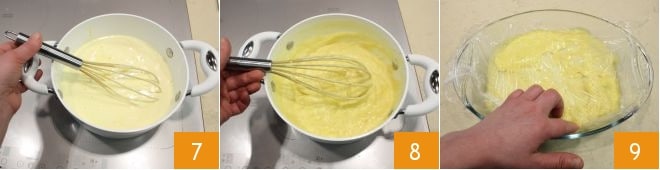
Turn the heat back on and continue stirring 7 until your pastry cream thickens 8. Then turn off the heat and transfer it to a wide and shallow dish. Immediately cover it with plastic wrap in contact with the surface 9 to prevent a skin from forming. Let it cool first to room temperature and then in the fridge.
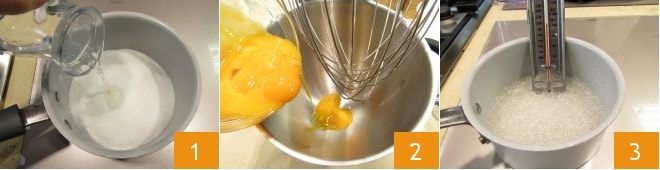
In the meantime, prepare the Buttercream. Pour the sugar and water into a thick-bottomed saucepan 1, then heat it over low heat, stirring occasionally with a steel spoon. Meanwhile, separate the eggs and pour the yolks into the bowl of a stand mixer 2. (Once you've set aside the 30 grams of egg whites needed for the royal icing, with the leftover egg whites from both the pastry cream and this buttercream, try making crispy French meringue (basic dough) or some tasty Lingue di gatto (flat cookies)). When the sugar has melted, stop stirring and bring the syrup to 250°F 3, using a kitchen thermometer to measure the correct temperature. Only when the syrup is almost at the indicated temperature, start the stand mixer and begin to beat the yolks.
Add the syrup in a thin stream 4 to the bowl of the stand mixer, which by then will have reached the right temperature, and continue to whip until completely cooled. Meanwhile, cut open the vanilla bean and, using a knife, scrape out the seeds 5. At this point, place the room-temperature butter in a bowl, and add the vanilla bean seeds 6.

Using a spoon, start working it until you have a homogeneous mixture 7. Gradually incorporate the vanilla-infused butter into the stand mixer 8, adding it one spoonful at a time, and continue beating until you obtain a soft and creamy mixture. Place the buttercream in a bowl 9 and store it in the fridge until ready to use.
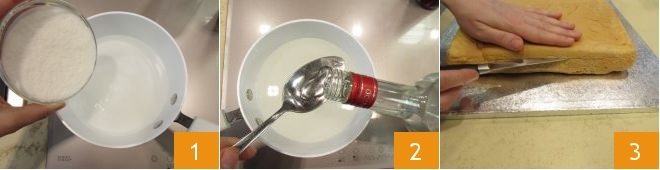
Lastly, prepare the How to make syrup for cakes. Pour the water and sugar into a saucepan 1, then heat it on the stove until the sugar has completely dissolved. Remove it from the heat and add the maraschino 2 (if you prefer, you can make a non-alcoholic syrup using flavoring instead of liqueur). Pour your syrup into a glass bowl and let it cool. Only when all the preparations made so far are well chilled can you proceed to assemble the cake. Cut the sponge cake into two layers, first making an incision on the side of the cake at mid-height 3.
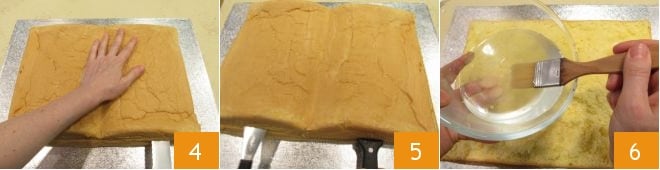
With the help of a knife with a long blade, cut the cake by passing the knife inside the incision and making a parallel motion to the cake 4. Lift the first layer of the sponge cake, inserting 2 sufficiently long spatulas inside, and lifting them gently 5. Using a brush, soak the bottom layer of the cake with the now-cold syrup 6.
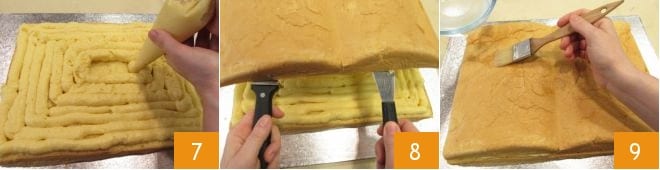
Place the pastry cream in a pastry bag and, applying pressure with your right hand, cover the entire surface of the cake 7. Position the top layer of the sponge cake 8, apply slight pressure with your hands to make it adhere well, then soak the surface with the remaining syrup 9.
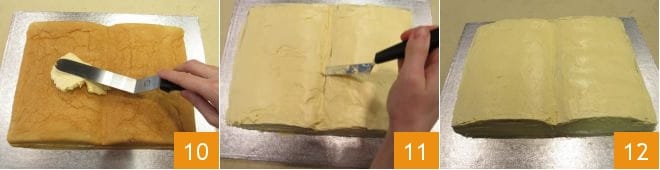
Once your cake has been soaked, proceed to cover it with the buttercream. Begin spreading the cream a little at a time 10, and using a spatula, cover the entire surface 11, then smooth it out as best as possible 12 and place the cake in the fridge.
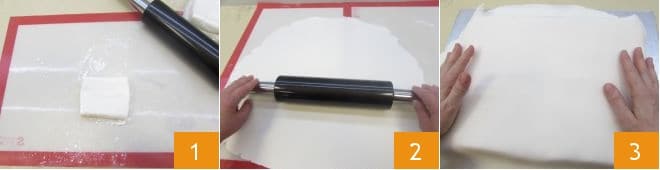
Once the cake is covered with buttercream, proceed to How to cover a cake with fondant. Take 2.2 lbs of white fondant 1 and roll it out on a silicone mat dusted with powdered sugar or cornstarch, until you obtain a layer sufficient to cover the cake, with dimensions of 18x14 inches and about 1/8 inch thick 2. Then, roll it onto the rolling pin and position it onto the cake 3.
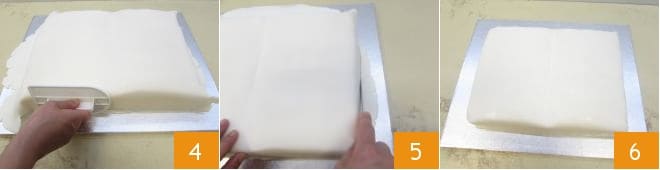
Using a smoother spatula, smooth the surface and sides 5, then trim off the excess fondant 6 to completely reveal the cake board 7.
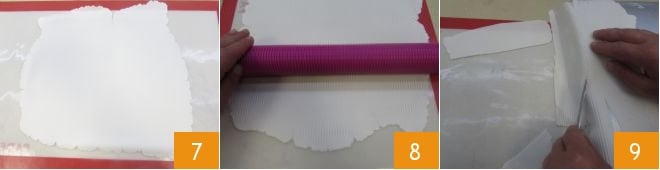
Roll out another portion of white fondant to create a thick rectangle 7 and, using a special rolling pin, imprint parallel lines on it 8, then use the cake pan as a template to position the fondant layer on its sides and trim what will become the pages of your book 9. Continue this way to create both the side and front pages; you can use a string to get the right dimensions. Re-knead the fondant scraps and set them aside, always wrapped in plastic wrap to prevent them from drying out.
Using edible glue, attach your pages to the sides of the cake 10. Roll out another portion of fondant until you have a 1/8 inch thickness, cut a precise rectangle 11 with dimensions of 14x5.5 inches 12.
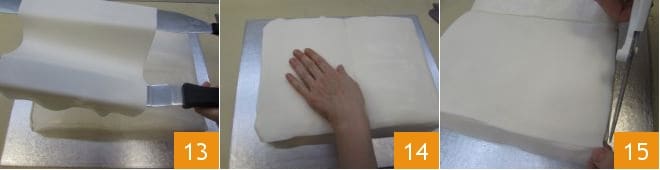
With the help of two spatulas 13, gently position it on one half of the cake to create the sheets of your book where you will write. Repeat the operation for the second half and smooth it out again 14. Trim any excess with scissors 15 and knead it again.
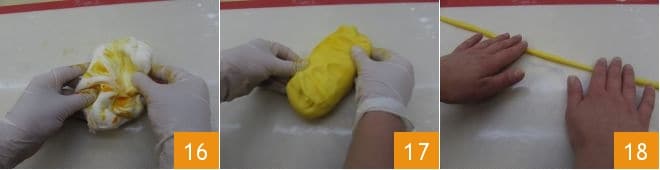
Add a little more fondant to the scraps and work it by adding a few drops of yellow food coloring 16 until you achieve a bright color 17. Take a portion and work it with your hands on a silicone mat to create a log about 1/2 inch thick 18, and set it aside.
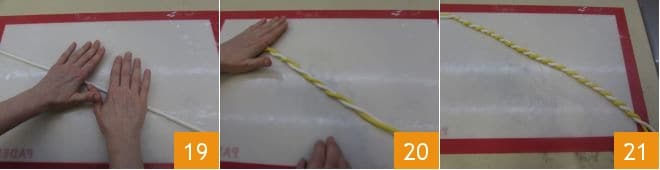
Repeat the same operation with white fondant, creating a white log of the same thickness as the yellow one 19. Then take the other log, align them and begin twisting them with your left hand 20 to intertwine them 21.
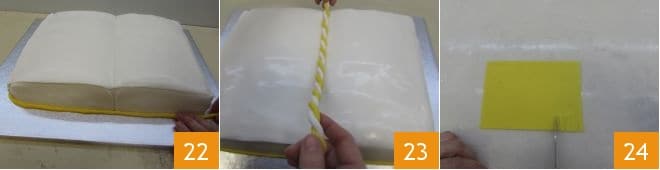
Create another yellow log, about 5/8 inch thick, and place it around the entire circumference of the cake 22, then place the bookmark on your cake 23. With the remaining yellow fondant, create a rectangle measuring 5x2 inches and cut small parallel slits along the longest side, spaced about 1/8 inch apart 24.
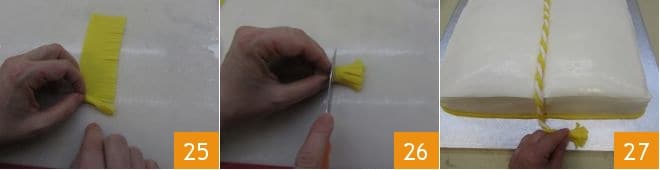
Roll the rectangle onto itself 25 and trim it to obtain only the fringe 26, then attach the tassel obtained at the end of the bookmark 27, using edible glue. Place the cake in the fridge.

Meanwhile, prepare the Royal icing Place the egg whites in a bowl, along with a few drops of lemon juice, which will make the mixture shinier. While mixing with a mixer, add the powdered sugar, one tablespoon at a time 1. Once all the sugar is added, you will have a smooth and thick mixture 2, then add a few drops of yellow food coloring and mix with a spatula.
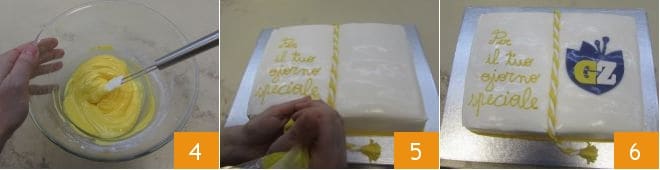
Once you achieve a uniform color 4, place the royal icing in a pastry bag and use it to write your personalized message on the cake 5. Refrigerate for at least 2 hours before serving your book cake 6.