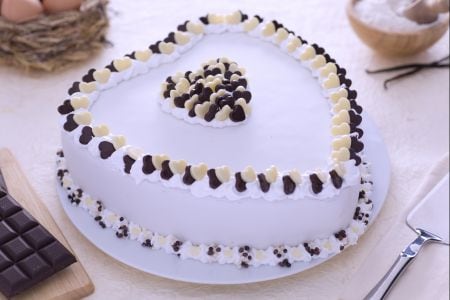
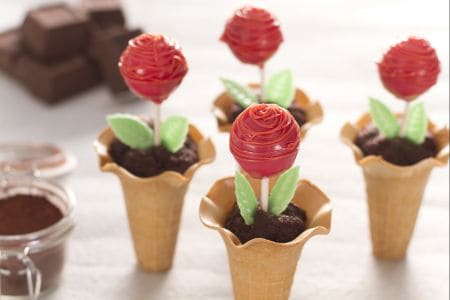
Rose cake pops
Rose cake pops are an original sweet treat to give as a gift: a vase made of cupcake batter and wafer, and roses made of doughnut and colored…
- Average
- 50 min
- Kcal 693
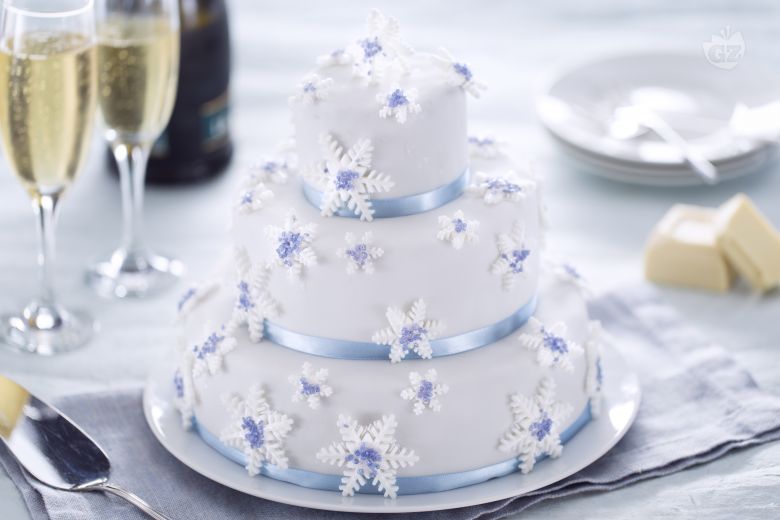
The torta fiocco di neve is, honestly, a festive masterpiece that can turn any holiday gathering into something magical. It's like, really special. Picture this: three layers of soft, moist white chocolate cake, perfectly sweet—like a winter wonderland on a plate. And what makes the torta fiocco di neve stand out is the rich dark chocolate ganache cream between each layer. It's so so tender it practically melts in your mouth.
And the decoration? Stunning. Delicate sugar paste snowflakes that sparkle like ice crystals, capturing the essence of a snowy Italian Christmas. No question, this cake is the centerpiece at Italian Christmas celebrations. It’s not just the elegant appearance; it's the delicious taste that brings the holiday spirit alive. Really. It’s a wonderful blend of elegant and creamy textures—each bite feels special.
The combination of white and dark chocolate creates a flavor harmony that keeps everyone coming back for more. Seriously good. Some folks like to add a twist with mascarpone cream or whipped cream for an even softer texture, offering a unique take on this torta natalizia.
And listen, whether as a thoughtful gift or a show-stopping dessert, the torta fiocco di neve ricetta brings a touch of holiday magic to any occasion. Sharing this cake? It’s like sharing a piece of holiday joy. Even those who aren't usually into sweets find themselves reaching for another slice. They’re enchanted by the blend of flavors and the delicate beauty of the cake.
It's not just dessert; it's an experience that combines artistry, a love for chocolate, and an excuse to indulge in something both visually stunning and really tasty. If you're hosting a family gathering or attending a festive party, this cake is sure to impress. It brings smiles to everyone’s face, making it a part of the holiday season. For sure.

To make the snowflake cake, start with preparing the three white chocolate bases. Finely chop the white chocolate with a knife 1, then melt it in a bain-marie with warm milk 2 and butter cut into pieces 3, being careful that the water underneath does not touch the container.

Stir with a spatula 4, then add the sugar 5 and let it dissolve completely; turn off the heat and let it cool. Place the butter, chocolate, and milk mixture in the bowl of a stand mixer fitted with a whisk 6 and start whipping.
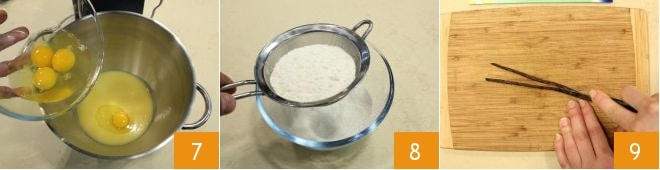
Add the eggs at room temperature one at a time, waiting for the previous one to be well incorporated before adding the next one 7. Sift the flour and baking powder 8, then cut the vanilla bean lengthwise and scrape out the seeds with a small knife 9.
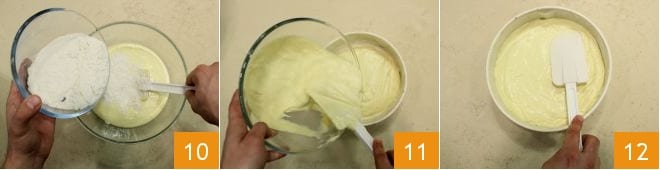
Once the mixture is whipped, transfer it to a bowl and add the dry ingredients along with the vanilla bean seeds a little at a time, folding with a spatula from bottom to top to mix all the ingredients well 10. At this point, place 2 steel rings lined with strips of parchment paper, one with a diameter of 6.3 inches and the other 4 inches, on a buttered baking sheet lined with a sheet of parchment paper. Pour the batter into the two rings until they are ⅔ full, and pour the remaining batter into a buttered springform pan How to line a cake tin with parchment paper measuring 8.7 inches 11, leveling the surface well 12. Bake the rings first: in a preheated static oven at 338°F for 30 minutes for the smaller cake (or at 302°F for 20 minutes if using a convection oven) and for 45 minutes for the medium one (35 minutes if using a convection oven). Once baked, remove from the oven and cook the larger cake at the same temperature for 60 minutes (50 if using a convection oven). If the surface of the cakes darkens too much during baking, cover with aluminum foil because the batter, containing a lot of sugar, tends to darken.
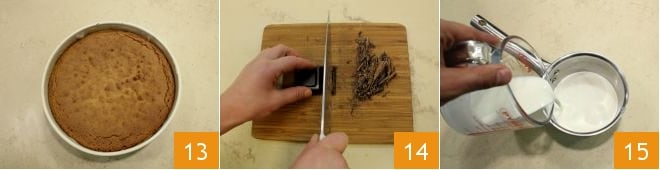
When the cake is ready 13, let it cool on a wire rack along with the smaller ones. Meanwhile, prepare the Ganache cream: chop the dark chocolate 14, then place a saucepan with cream on the heat to warm it 15.
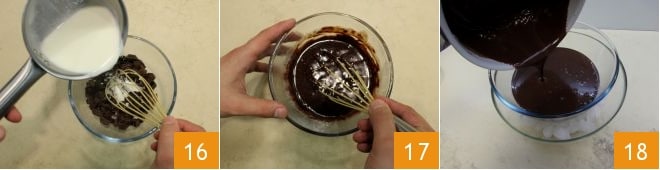
When the cream is about to boil, pour it over the chopped chocolate 16, stirring with a whisk to melt it completely 17. Transfer the chocolate and cream mixture to a bowl containing ice 18 and
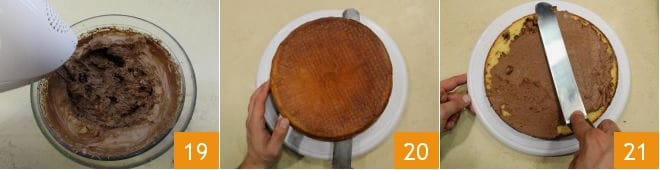
whip it for 10-15 minutes with an electric mixer with whisks 19. When the larger cake has completely cooled, cut it in half 20 and use a spatula to spread a portion of the ganache you prepared on the base layer 21.
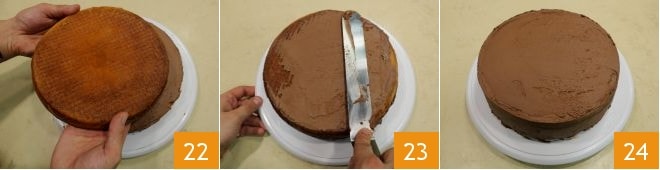
Reassemble the cake by placing the other disc on the filling 22, then cover the entire surface with some of the ganache 23, spreading it evenly on all sides 24. Let the cake set in the refrigerator for at least 30 minutes, then proceed the same way with the other two smaller ones.

Take the already rolled sugar paste, unroll it 1 and How to cover a cake with fondant the larger cake with the help of a rolling pin 2. Smooth the surface and sides with a smoother to adhere the sugar paste well and avoid folds 3,

then trim the edges with a smooth-bladed knife 4, removing the excess part that you will save for the final decorations. Once ready 5, cover the other 2 smaller cakes in the same way. Knead the leftover sugar paste you saved and roll out the paste on a work surface dusted with powdered sugar; with specific cutters of 3 different sizes, cut out snowflakes 6.
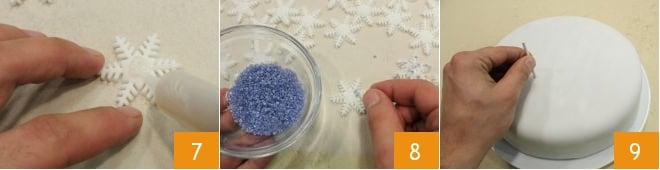
Take the pearl-colored edible glitter pen and decorate the snowflakes you obtained 7. Take the blue glitter sugars, distribute them on the snowflakes 8, and let them dry for one night. Now you can assemble the cake: insert 4 plastic rods (the same height as the base) in the center of the larger cake 9 and stack a cardboard circle with a diameter less than 6.3 inches on top.

Place the medium cake 10 and then the smaller one 11, stacking them one on top of the other 12.
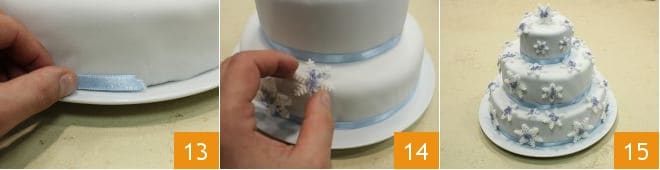
decorate the base of each tier with the blue satin ribbon 13. Take the edible glue, brush the back of the snowflakes. Gently attach them to the cake, distributing them on each tier 14, pressing with your fingers for 1 minute so they adhere well: your beautiful snowflake cake is ready to be served and enjoyed 15!