Fondant Sugar
In this cooking school sheet, we teach you how to prepare fondant sugar to make your desserts more beautiful and delicious!
- Difficult
- 1 h 30 min
- Kcal 57
Fondant cake covering? It’s all about getting that smooth, tender layer that makes a cake look super special. At cake shops—or at home—people who want to ricoprire torta pasta di zucchero know that starting with good-quality fondant makes all the difference. I mean, you want it to be elastic but not sticky. Rolls out nice and even. No cracks or lumps. Whether you’re going simple or going all out, a flawless copertura torta pasta di zucchero sets the stage for everything else.
Sometimes folks use pasta di zucchero colorata for those bright pops of color, or keep it white for that classic vibe—either way, that first smooth finish? Key. The right fondant feels like moist playdough—flexible yet firm—and you’ll know you’ve nailed it when it drapes over the cake like a soft sheet. And look, people chat a lot about the best tips for come ricoprire una torta con pasta di zucchero. Thing is, using fondant that’s easy to shape and doesn’t stick to everything is the secret.
Honestly, getting that perfect finish often involves watching a tutorial copertura torta di zucchero first, especially for birthdays or special events. It’s not just about looks—getting that golden finish makes all the decor on top stand out. With the right technique, you get a crispy edge along the bottom and a perfect, smooth top. Seriously good. Modern cake design is kind of a mix of art and fun, and there’s a whole world of tecniche decorazione torta di zucchero to try. Some folks add simple flowers, while others go wild with stacked shapes and all sorts of decorare torta pasta di zucchero ideas.
For real, what really matters is starting with that even fondant layer—done right, it turns any cake into a real centerpiece. And you know, whether you’re just getting into decorating or you’ve been at it for ages, nailing the ricoprire torta pasta di zucchero step is the best way to get your cake looking sharp and ready for anything. Pretty much.
You might also like:
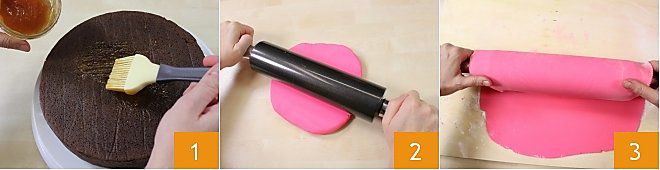
Take the cake you want to use, we prepared the Mud cake because this base lends itself well to being covered with fondant; if you prefer, you can also prepare a Sponge cake. Using a brush, coat the entire surface and sides of the cake with apricot or peach jam 1, this will serve as a “glue” to ensure the fondant perfectly adheres to the cake. To facilitate the process, we recommend placing the cake on a turntable if you have one. Dust a work surface with powdered sugar and roll out the room-temperature fondant using a cold fondant rolling pin on a cold, smooth surface 2. A regular work surface is not suitable because the fondant would not turn out perfectly smooth. You can use a silicone mat or simply parchment paper. Roll out the fondant to the desired size and thickness, we recommend not thinner than 1/8 inch, then roll the fondant onto the rolling pin 3
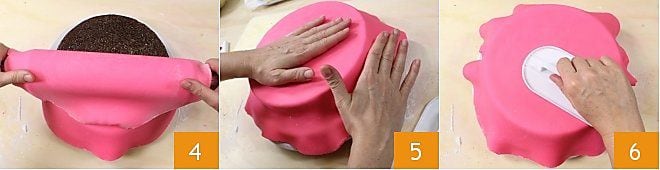
and lay the rolled fondant over the cake 4. Apply light pressure with your hands to adjust the fondant on the cake, then with a special fondant spatula ensure the fondant adheres perfectly without forming wrinkles or creases, use the fondant spatula to apply gentle pressure 5 on both the top of the cake 6
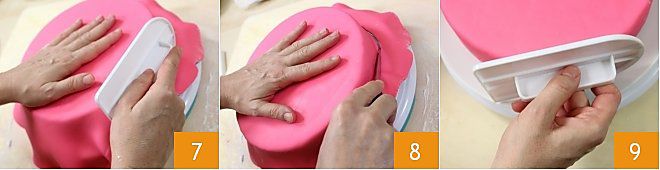
and the sides 7, then with a small knife cut off any excess fondant from the edges of the cake 8, keeping the knife blade close to the base, and refine the coverage by going over it with the spatula 9.
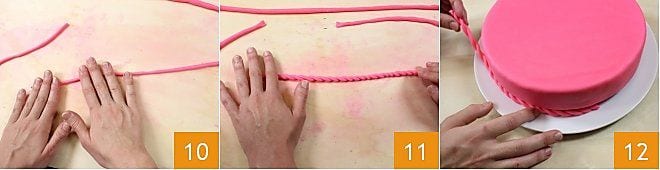
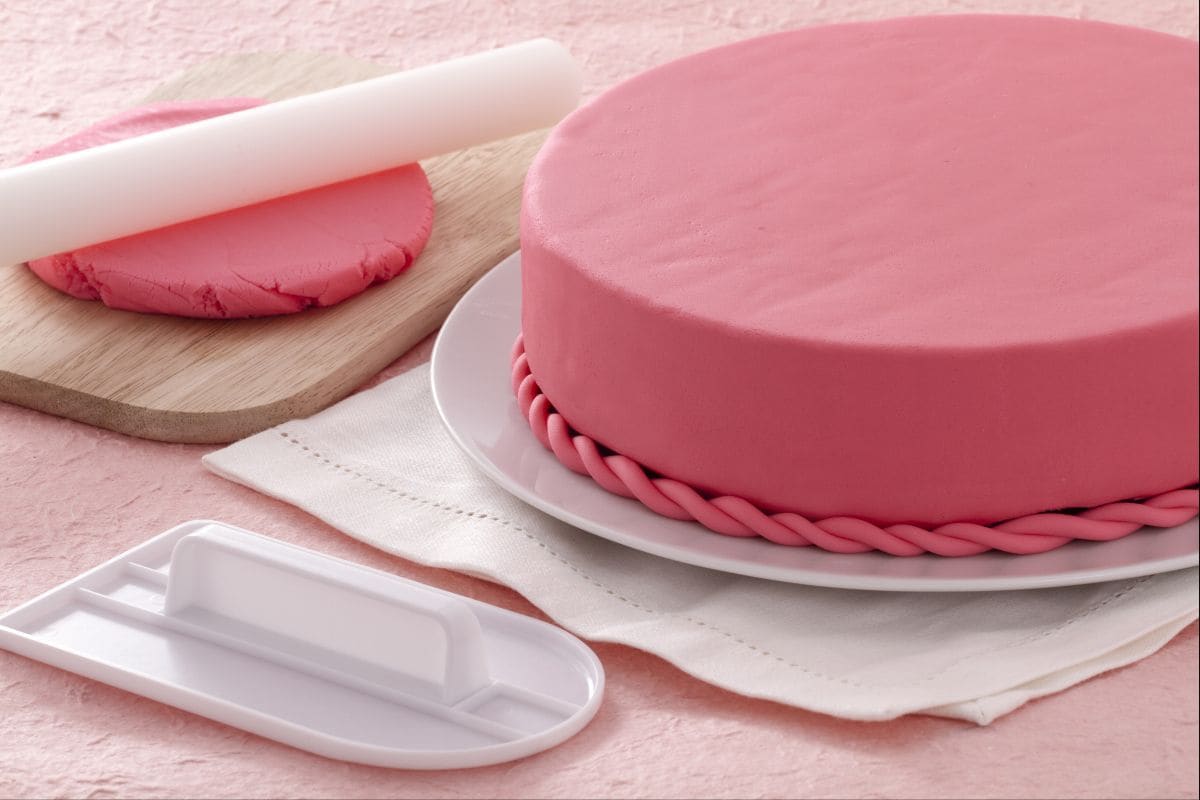
To finish your cake, you can make decorations at the base of the cake. Model the remaining fondant into a sausage shape to create two ropes and twist them together (10-11), for this you just need to roll the ropes onto themselves. Your cake is now perfectly covered with fondant and ready to be further decorated, or to be eaten!