
Sfogliatelle Frolle
Sfogliatelle frolle are typical Neapolitan pastries. A shell of shortcrust pastry encloses a filling of ricotta and semolina.
- Average
- 1 h 15 min
- Kcal 267
Milano shortbread, or la frolla Milano, is a classic pastry dough that you'll spot all over Lombardy. Not just any dough—it’s the backbone of those tender, melt-in-your-mouth Milano cookies in fancy bakeries and at home tables across Italy. People up north have been using this recipe forever. Everything from delicate jam crostate to crisp sandwich cookies. And the thing is, what really sets this dough apart is the attention to detail. Seriously good. The fat, flour and sugar can’t just be tossed together. You gotta watch their temperature and texture. Maestro Iginio Massari, one of Italy’s top pastry experts, always points out that a really professional Milano cookie recipe starts with ingredients at just the right chill. That’s how you get that perfect bite—moist but never soggy, light but not crumbly.
It’s this level of care that turns an ordinary dessert into something special. Smooth, easy to work with, and the results? Always golden and delicious. Really really nice.
Making this dough lets anyone taste Italian technique right in their own kitchen. For sure. People who want to try their hand at homemade Milano cookies get the bonus of learning a bit about how real pastry chefs think. You don’t need a bunch of fancy stuff. Just good basics, a little patience, and suddenly you’re on your way to making treats that remind you of the best Pepperidge Farm cookies—only fresher.
The process of making frolla Milano is kinda like a fun puzzle, where each move matters, and you get to eat the reward. Whether you’re shaping delicate cookies, prepping a tart base, or experimenting with copycat Milano cookie ingredients, the dough’s flexibility keeps things interesting. One bite and you’ll notice how the buttery flavor really shines.
For anyone curious about how to make Milano cookies that taste like they came straight from a pasticceria in Lombardy, this dough is the answer—reliable, sweet, and always ready for your next baking idea. With just a little practice, you'll be crafting delicious creations that capture the heart of Italian baking. Pretty much.
You might also like:

To prepare the Milano shortcrust, the butter should be soft but still plastic and cut into small pieces. Place it in the stand mixer with the paddle attachment 1, add the powdered sugar 2 and the acacia honey 3 which will make the shortcrust more golden and provide a more uniform baking, even for the base.
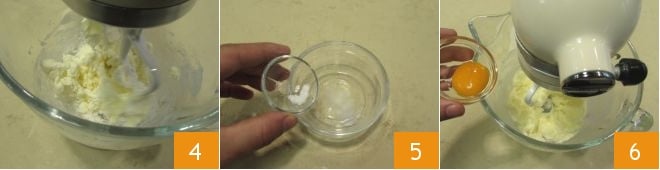
Start the stand mixer at the lowest speed: the butter needs to absorb the honey and sugar 4, but it should not whip. Stop the stand mixer, dissolve the salt in a small amount of water (about a teaspoon) 5, it should dissolve well so it won't be noticeable on the palate. Add the egg yolk to the stand mixer 6.
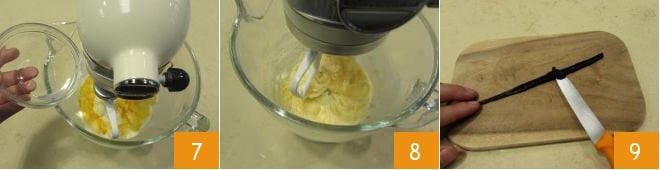
Add the dissolved salt in water into the stand mixer 7 and start it again at a low speed 8. Slice the vanilla bean lengthwise and collect the seeds 9
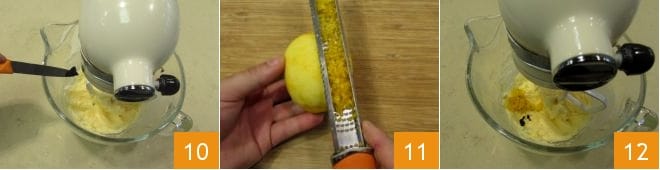
add them to the stand mixer 10: note that 1 g of vanilla pulp flavors about 10,000 grams of dough. It is one of the most powerful natural aromas that exist. Grate the zest of an untreated lemon using a grater, scraping from the top to ensure only the yellow part of the zest is collected 11. Add the zest to the dough 12.
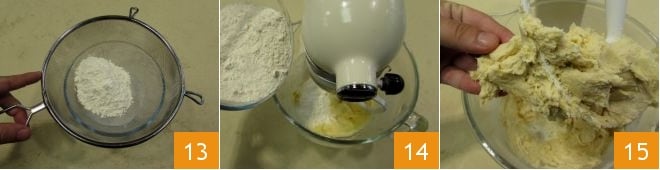
Sift the flour and add it all at once to the stand mixer 13 then start the stand mixer again and pay attention to this phase: you should work at a low speed only until the butter has incorporated all the flour. To test the consistency of the dough, take a small piece 15 and handle it for a few moments.
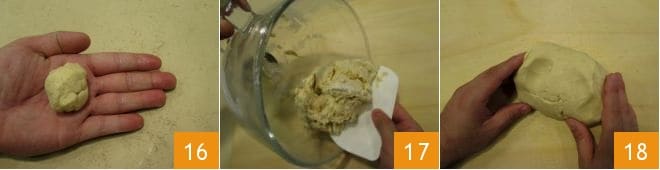
If your hands remain clean 16, the dough is ready. Then turn it out onto a work surface using a dough scraper 17 and shape it into a cylindrical form 18
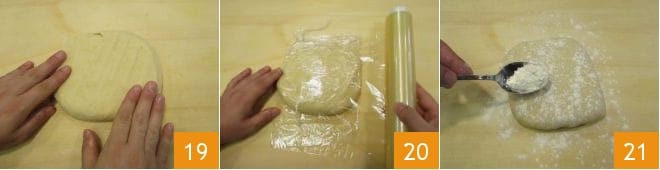
flatten it 19, and seal it well in plastic wrap 20, store it in the fridge for a couple of hours, or even better overnight so that the fats and sugars have time to stabilize, making the dough more workable with a rolling pin. Then take the dough out of the fridge and remove the plastic wrap, lightly dust the work surface and the top of the dough block 21
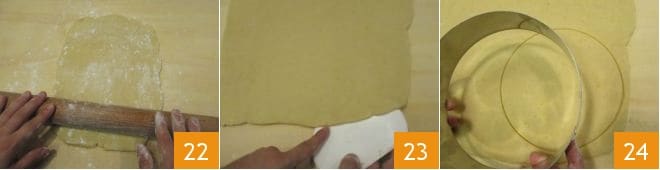
then roll out the shortcrust with a rolling pin 22 until it reaches a thickness of about 1/6 inch; you can check the uniformity by running your index and thumb along the edges of the dough; if it is thicker in some spots 23 you can roll over it again where necessary. Now, if you prefer, you can create a base for a jam, cream, or chocolate tart in this way: use an 18 cm ring to cut the shortcrust 24
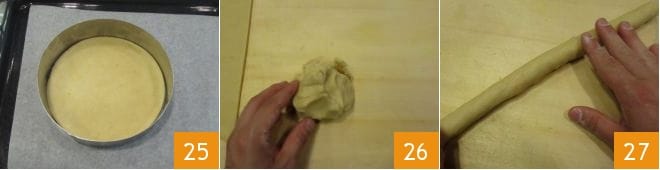
and place it on a baking sheet lined with parchment paper 25, first positioning the disc onto the baking tray and then transferring the dough. You can take a portion of the leftover dough 26 and make a cord 27: this will be used to create the edge of the tart.
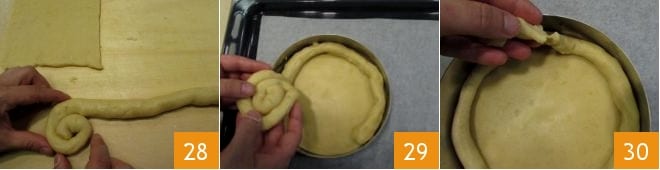
Roll it into a spiral on the work surface 28 and unroll it along the perimeter of the ring mold 29; then remove the excess dough 30.
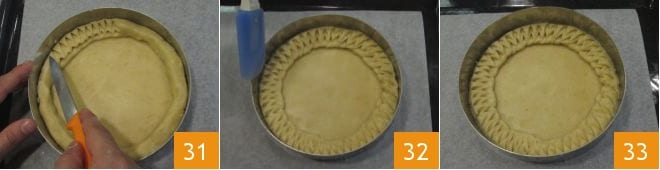
Then press it slightly with your fingers and use the tip of a knife (or a teaspoon) to create a decorative pattern, pressing with the tip in one spot of the shortcrust and just below, continuing this way all along the perimeter 31; then smooth the edge with a spatula, pressing slightly evenly along the perimeter (32-33); finally, prick the bottom with the knife point and your tart will be ready to be filled and baked.
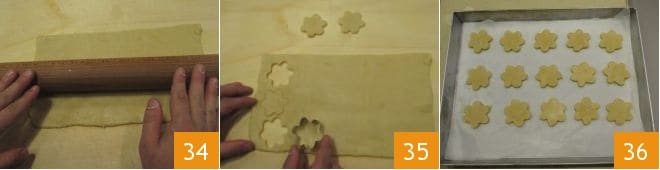
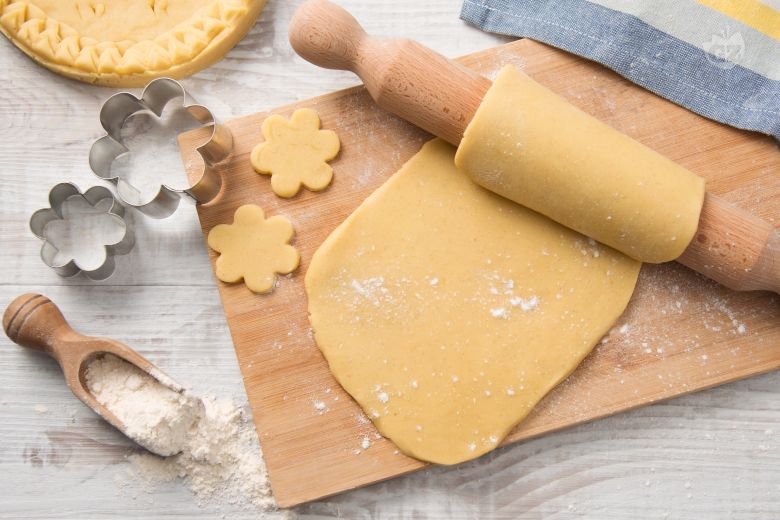
For cookies, instead, lightly flour the work surface and the top of the dough again and roll it out with a rolling pin, until it reaches a thickness of about 1/12 inch 34, then cut out your cookies: we chose flower-shaped cutters 35. As you go, distribute them on a baking sheet lined with parchment paper, spaced evenly; this is important because it will ensure even baking. Your cookies are ready to be baked 36.