Savory cones with mortadella mousse
Having a drink with your friends and don't know what recipe to prepare to impress them? Try the savory cones with mortadella mousse!
- Easy
- 30 min
- Kcal 245
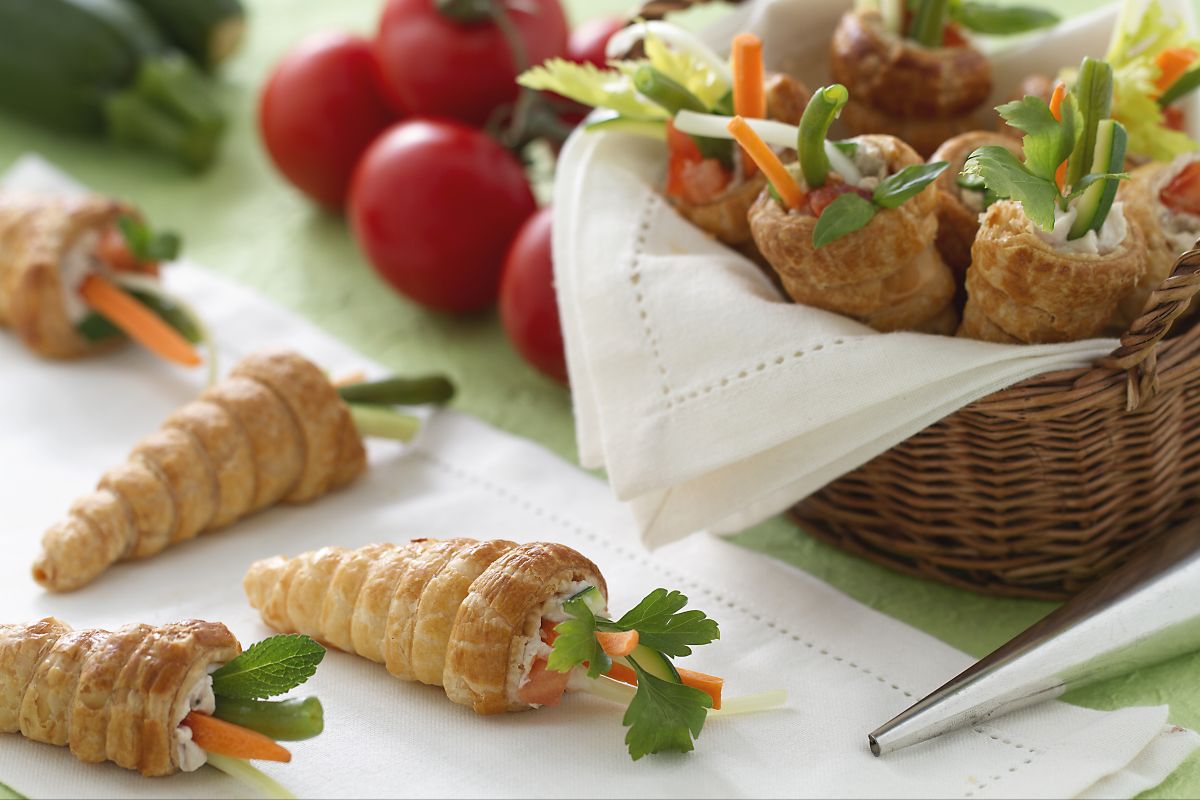
Have you ever tried spring cones? They’re a total game-changer. Super fun and colorful, they brighten up any table. So, conetti primavera—it’s inspired by Italy but with a cool modern twist. And you know what? It’s got ingredients like Philadelphia cheese. You start by shaping puff pastry into cones, bake them until they’re crispy and golden. Really, really fun part? The fillings. Whether you pick ham, mortadella with pistachios, or a veggie mix with fresh chives or parsley, it's up to you.
Once these puff pastry appetizers are baked and filled, just top with seasonal veggies. It’s got that spring vibe. This dish isn’t tied to a specific Italian region, so go wild with fresh stuff from your fridge. Pretty much makes it easy to personalize, which is great.
People are into these vegetable cones because of how quickly they come together—and look. So many ways to decorate them. Toss in some carrots, radishes, or tender zucchini for that pop of color and crunch. The puff pastry gives you this awesome combo of crispy outside and cool, moist inside. Perfect for any spring party or holiday spread.
These are awesome party snacks or even healthy party bites. Perfect for sharing, for sure. Go classic with meat and cheese, or light with herbs and veggies—it’s your call. Seriously good either way. Each bite? A fresh, tangy flavor that’s easy to enjoy by hand. Prepping for a picnic, family gathering, or just want some seasonal finger foods? These cones fit all the springtime vibes. You can’t go wrong. Seriously, can't go wrong.
You might also like:
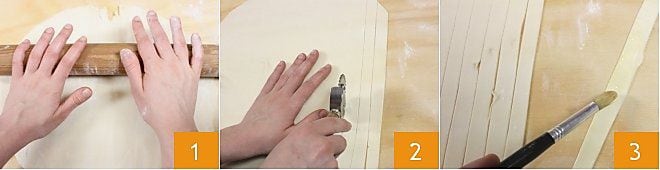
To prepare the spring cones, start by flouring the work surface, then slightly roll out the puff pastry with a rolling pin 1. Once rolled out, cut the puff pastry into strips about half an inch wide 2. Brush the obtained strips with beaten egg 3.
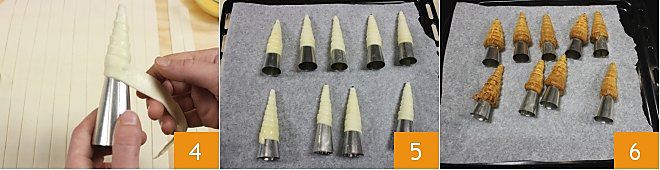
Wrap the puff pastry strip around the special cone for cannoli, starting to wrap the strip from the pointed part of the spindle and proceeding towards the wider part 4. It is important that the side of the pastry that was brushed with the egg does not come into contact with the cone but remains exposed so that the egg acts as a glue between the overlapping puff pastry parts. After completing this work, place the cones on a baking sheet covered with parchment paper and bake in a preheated oven at 356°F (or 320°F if using a convection oven) for 20 minutes (or about 15 minutes if using a convection oven) 5. When the cones are golden, take them out of the oven 6. While your cones cool down, prepare the creams to fill them.
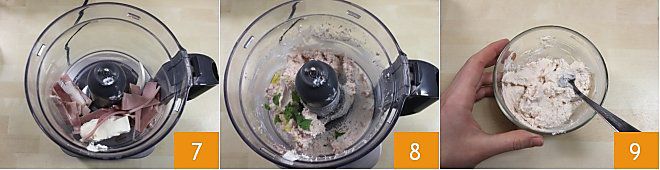
To prepare the cooked ham cream, put the cooked ham, cream cheese 7, and basil 8 in a mixer and blend until you get a thick cream (it is possible to add a splash of cream to make the sauce creamier). Once the cream is obtained, adjust the salt and pepper, blend everything again until you get the right consistency 9. Your cooked ham cream is ready, then move on to preparing the mortadella and pistachio-based cream.
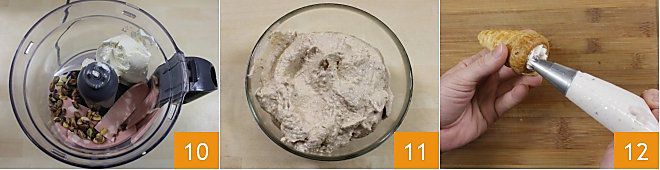
To prepare the mortadella and pistachio cream, put the mortadella, cream cheese, shelled pistachios, and a drizzle of extra virgin olive oil 10 in the mixer. Blend until you get a thick cream (it is possible to add a splash of cream to make the sauce creamier) 11. The creams are ready, put them in two different pastry bags and fill your cones 12 (if you don't have pastry bags, you can take a freezer bag, fill it with cream, cut a corner of the bag to let the cream out, and fill the cones).

Once the cones are filled, prepare the vegetables to decorate them. Cut the carrots 13 and celery 14 into rather thin strips, while cut the tomato into small cubes 15.
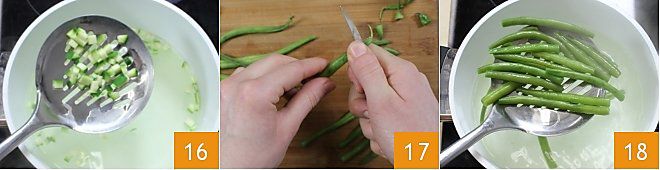
Also, cut the zucchini into small cubes and blanch the obtained cubes 16. Take the green beans, clean them by trimming the ends 17, and blanch them 18.

Decorate your cones to your liking with the cubes of tomato and zucchini and finish with a basil leaf 19, or inserting the celery and carrot sticks into the cream 20 and decorating with a mint leaf 21. Your spring cones are ready, keep them in the refrigerator until it's time to serve them.