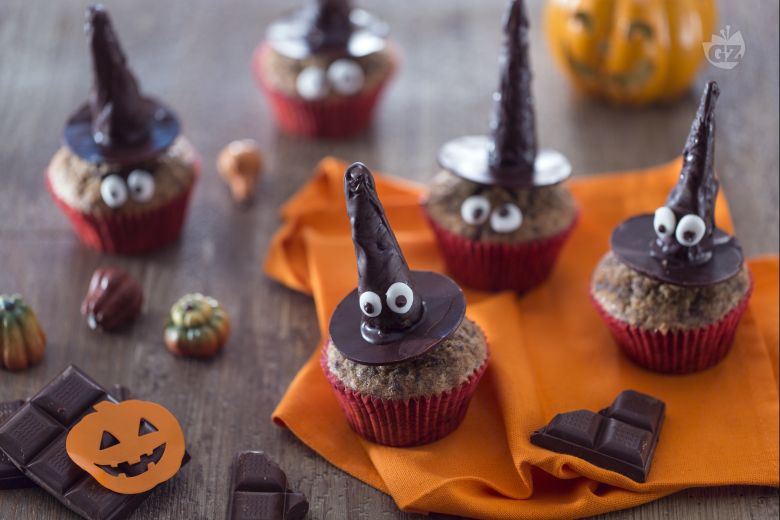
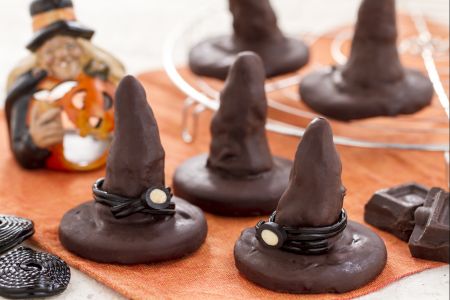
Witches' Hats
Witches' hats are delicious chocolate treats to prepare for Halloween to amaze and delight both adults and children!
- Average
- 1 h 20 min
- Kcal 1060
No-bake treats add playful fun to spooky celebrations, and these witches’ hats make any Halloween table look extra festive with their charming look and sweet vibe.Families often reach for these when they want something that feels special but still fits into their busy day—just seeing the fun, pointed shapes and bright, contrasting colors has everyone reaching for one.Across the room, this good-looking Halloween snack just draws in party guests, working well as one of those eye-catching Halloween treats everyone wants to try (kids and grownups alike).Set out a platter and watch them disappear—they’re reliable for school parties, work events, or whenever you want a seasonal dessert idea that feels cheerful and a little bit magical.Great for building a table centerpiece right alongside other chocolate-themed desserts and festive sweets, these hats check a lot of boxes for home cooks who want snacks that look store-bought, taste DELICIOUS, and always get compliments.
Anyone looking for quick dessert ideas or easy Halloween snacks finds these witches’ hats impossible to resist—nice for last-minute plans, birthday parties, or anytime chocolate cookies sound like a good fit.The best part is how these simple no-bake treats work for so many different groups: hungry students, snack-loving families, tired parents who want a crowd-pleaser, or bakers who just want something that turns out great every time.Offering reliable fun for kids’ gatherings while working perfectly with tea or warm cider (honestly, even just a glass of milk makes them even better)...Home bakers love how the finished hats always have a good shape and satisfying snap in each bite—plus the sweet chocolatey flavor fits everything from party buffets to after-dinner cravings.The whimsical style makes these memorable for any themed bash, and their quick adaptability means everyone can make them their own—really, families love the chance to share in something DELICIOUS and festive so easily, especially when every bite brings that simple, kid-friendly happiness right to the table.
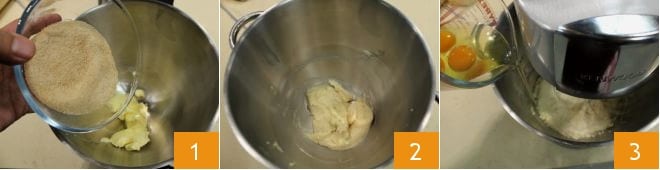
To make the witches with hats, start by preparing the muffins: in the bowl of a stand mixer fitted with a paddle attachment, add the brown sugar along with the softened butter at room temperature 1 and turn on the paddle until you obtain a smooth cream 2. Stop the mixer and replace the paddle with the whisk, then add the whole eggs one at a time, waiting for one to be absorbed before proceeding with another 3.
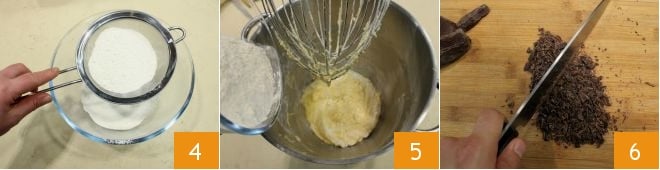
Sift the flour together with the baking powder 4 and add it to the mixture little by little 5; keep the mixer going, in the meantime finely chop the dark chocolate with a knife 6

then add it to the batter 7. When the chocolate chips are well combined 8, with the help of a spatula, transfer the batter you obtained into a pastry bag without a nozzle to which you can make an opening 9.
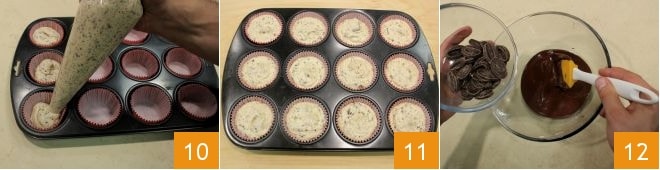
Place 12 paper cups in a muffin tin and with the pastry bag fill each cup to ¾ with the batter 10. When you have finished 11, bake in a static oven preheated to 340°F (or 300°F for 20-25 minutes if using a convection oven) for 25-30 minutes. Meanwhile, you can prepare the witches' hats: first, place an aluminum baking sheet in the freezer (you will need it later); then melt about 4.5 oz of chocolate in the microwave for 2 minutes at maximum power 12 (you can also melt the chocolate in a bain-marie); finely chop the remaining chocolate and set aside.
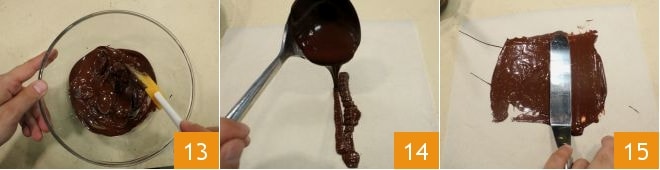
Stir with a spatula every 40/50 seconds 13 and once it has melted, add the chopped chocolate, continuing to stir until it is completely melted (if necessary, place it in the microwave for a few more seconds). At this point, pour 2/3 of the melted chocolate onto a sheet of parchment paper 14 and spread it with a spatula to a thickness of 1/8 inch 15. Keep the remaining melted chocolate because you will need it later to cover and assemble the hats.
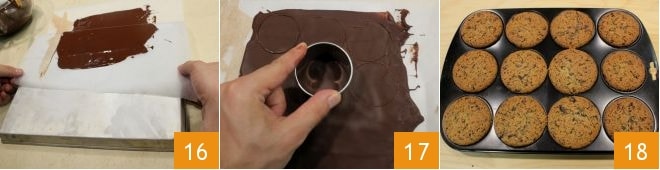
Transfer the parchment paper sheet onto the bottom of the inverted baking sheet that you previously cooled in the freezer 16: when the chocolate has slightly set, use a 2.2-inch-diameter pastry cutter to make 12 disks and then place them in the refrigerator to set for at least 30 minutes 17. Meanwhile, check the muffins' doneness by doing the toothpick test: insert the toothpick into the center of the muffin and if it comes out clean, it means they are ready 18; otherwise, extend the baking time by a few minutes. Then take them out of the oven and let them cool completely.
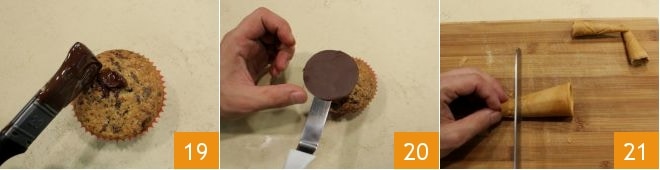
When the muffins have cooled, place a small amount of the reserved melted chocolate in the center of each muffin to ensure the base of the hat adheres well 19; then place the chocolate disk you made earlier: it will be the brim of the hat 20. If, during the hat-making process, the melted chocolate tends to solidify, melt it again in the microwave for a few seconds. With a knife, cut the tips off the wafer cones: these will be used to make the top part of the hats 21;
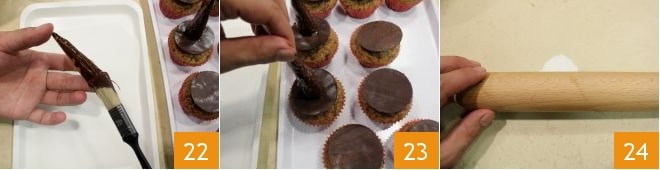
Brush the entire surface of the tips well with the melted chocolate, covering them evenly 22. With the remaining melted chocolate, attach the covered wafers to the disks you placed earlier on the muffins 23. Finish the witches with hats by making the eyes: roll out the sugar paste with a rolling pin to a thickness of 3/16 inch 24;
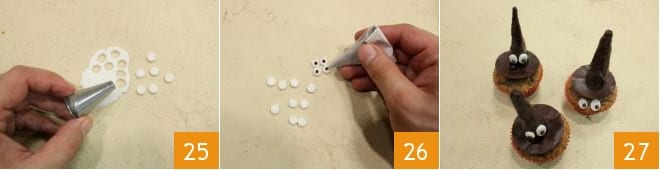
With the help of a plain tip of a pastry bag, make 25 discs measuring 1/4 inch 25 and with a paper cone filled with the remaining melted chocolate, create the pupils by placing a dot of chocolate on each disc 26. Once ready, attach the eyes by placing a dot of melted chocolate: you can decide whether to place them directly on the hats or on the muffins just below the brim. Let the chocolate cool for 30 minutes at room temperature and finally, you can serve and enjoy your witches with hats 27!