
Gingerbread Garland
The gingerbread garland is a tasty idea to decorate your house for Christmas: crispy gingerbread cookies and cocoa and hazelnut shortcrust pastry
- Average
- 55 min
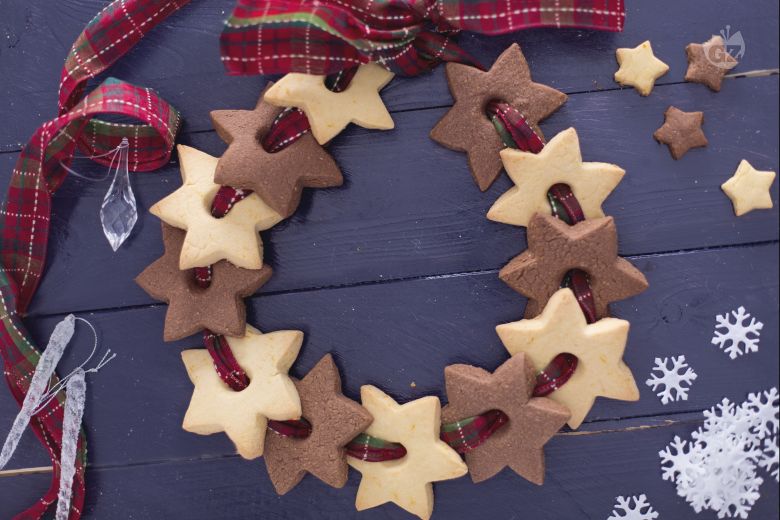
Ghirlanda di stelline, you know, is a truly awesome Italian tradition that makes the holidays feel super sweet and special. In northern Italy, families really enjoy creating these ghirlanda di stelline during Christmas. Pretty much. This festive treat is a wreath made from tender, crumbly cookies shaped like stars. Some have cocoa, others vanilla. And here's the thing: these charming biscotti a forma di stella are tied together with a bright, colorful ribbon—really, really pretty—turning them into a beautiful, edible decoration for your table or even your tree. It’s not just about dessert; it’s about bringing that whole Christmas vibe to life.
The mix of golden vanilla and rich cocoa offers different tastes in every bite. And the sight of those stars arranged in a wreath? Magical, for sure. This ricetta ghirlanda di stelline is a refreshing change from the usual holiday cookies, adding a splash of Italian creativity to any gathering. And look, if you’re thinking about making your own decorazioni natalizie commestibili, this wreath is just perfect.
You can show off your style by arranging the stars or choosing ribbons that match your holiday theme. In Italy, families often get kids involved, turning it into a fun group activity. Which is great. The moist pasta frolla dough results in cookies that are super crispy once baked, giving a satisfying snap with every bite. And listen, having this ghirlanda di biscotti as a centerpiece on your table? It’s a standout centrotavola commestibile—guests just pull off a star whenever they want a snack.
These dolci natalizi fai da te pair beautifully with coffee or hot chocolate, sparking conversations and cozy moments. Whether you’re searching for ideas for dolci di Natale or just want something fun to bring everyone together, this edible wreath adds a cozy, sweet Italian touch to your holidays, making them even more memorable.
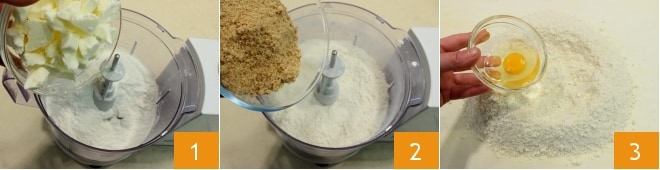
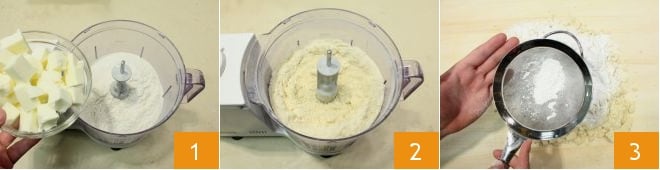
To prepare the star garland, start with the cocoa and hazelnut shortcrust pastry: place the sifted flour and cold butter from the fridge cut into pieces in the mixer 1; activate it to create a sandy mixture, then add the hazelnut flour 2 and let the blades run again. Transfer the obtained mixture onto a work surface and create the classic fountain shape: place the egg in the center 3
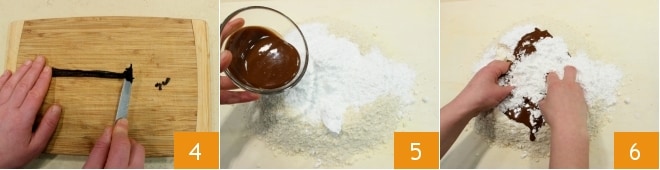
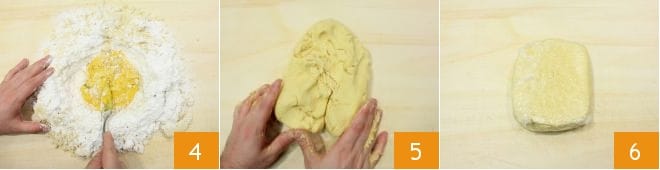
then cut a vanilla pod and scrape out the seeds with the blade of a knife 4. Pour them into the center of the fountain; also add the powdered sugar and hazelnut paste 5 and start kneading quickly 6, until you get a compact and smooth consistency.
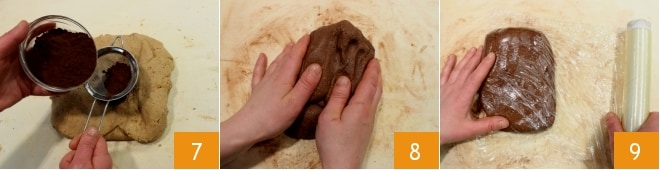
Dust the shortcrust dough with sifted cocoa powder 7 and mix it into the dough 8. Now that you have obtained a smooth and compact dough, flatten it slightly and wrap it in plastic wrap 9: let it rest for at least 30 minutes in the refrigerator.
To prepare the light shortcrust pastry, start by pouring the cold butter in pieces and the flour into the mixer bowl 1 and create the sandy texture by pulsing the blades intermittently to avoid overheating the ingredients 2. Turn the sandy mixture onto the work surface and add the sifted powdered sugar 3,
then add the seeds of half a vanilla pod and the egg yolks, and mix first with a fork 4, then quickly by hand just enough to compact the shortcrust pastry 5; form a dough, slightly flatten it, and wrap it in plastic wrap, then place it in the refrigerator for at least 30 minutes.
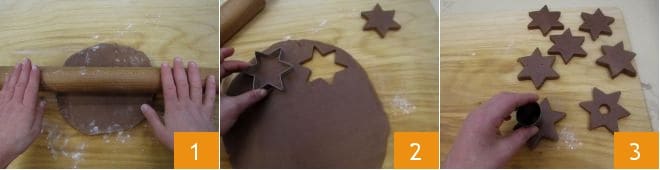
Take the cocoa and hazelnut shortcrust dough and roll it out to a thickness of about 0.4 inches (1 cm) on a lightly floured work surface 1; with an 8 cm cookie cutter, cut out 20 stars (you can also reuse the dough scraps by kneading and rolling it out again) 2, then make a central hole by cutting out the stars with a 0.8-inch (2 cm) diameter cookie cutter 3.
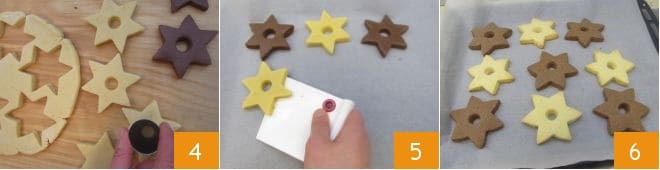
Do the same operations for the light shortcrust pastry: cut out 20 stars and cut out the center 4, then place them slightly apart on baking sheets lined with parchment paper 5, and place them in the refrigerator for about 15 minutes so that they hold their shape during baking. Bake in a preheated static oven at 340°F (170°C) for about 15 minutes (300°F/150°C for about 8-10 minutes, in this case, you can bake only a few as the first batch to better adjust the time and ideal temperature for your oven). Once baked, take out the stars 6 and let them cool completely on a wire rack.
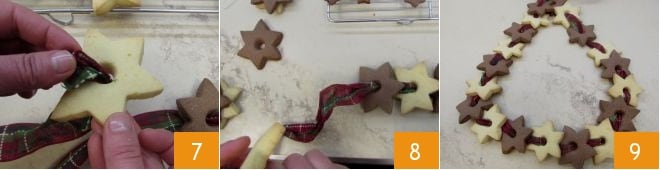
then take a ribbon in your preferred pattern and thread it through the holes 7 alternating a light star and a cocoa one 8. With these quantities, you can make two garlands of 20 stars each 9!