Brick cake (Layered no-bake cake)
Brick cake (layered no-bake cake) is a delicious soft cake that's perfect for novice bakers or anyone looking for a dessert that isn't too…
- Easy
- 50 min
- Kcal 760
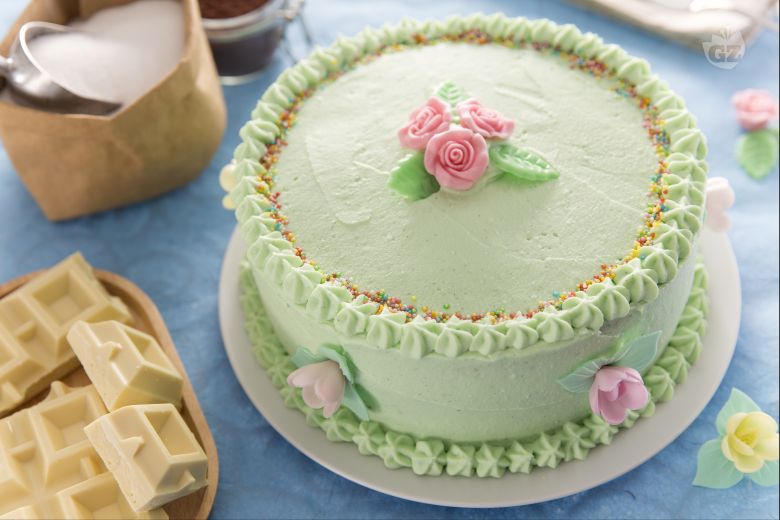
Torta farcita a strati is one of those Italian desserts that really just looks as good as it tastes. Picture this: a cake with moist, fluffy pan di Spagna that’s got a touch of cacao. So every bite has that rich, tender vibe. And the crema pasticcera? It gets a boost from white chocolate, giving you a sweet yet light contrast with the sponge. People in Italy love making these cakes for birthdays, holidays—pretty much any time you want to impress.
The fun part? The decoration. Pastel green whipped cream, a few colorful sugar balls, and tiny wafer flowers. Everything comes together, so the whole thing looks almost too pretty to eat. But it’s not just about looks—each layer in this torta farcita a strati offers a different flavor and texture, which is why it’s so popular for dolci per occasioni speciali.
Across different regions of Italy, you’ll see little twists. Sometimes they use fruit or swap the chocolate for a different kind of filling. But the classic ricetta torta a strati with white chocolate cream is a favorite for folks who want something a bit fancy. The pastel green whipped cream isn’t just for show—oh no—it adds a creamy lightness on top of the deeper cocoa flavors. And those sugar pearls? They crunch a little, which pairs perfectly with the soft, golden cake underneath.
Guests always notice the torta a strati con crema because it stands out on the dessert table. Whether you go all-out with the decorations or keep it simple, this cake just works for pretty much any big get-together. There’s something about the mix of colors and layers that makes everyone want a slice. It’s the kind of dessert that shows you put in that extra effort—without it actually being super super hard to pull off. So next time you need a showstopper, a torta multistrato like this is bound to impress, both for its looks and for its tender, rich taste.
You might also like:

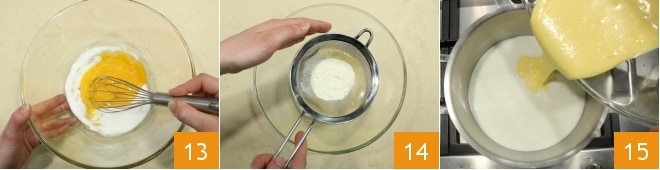
To make the layered filled cake, start with the base mixture: place the whole eggs and yolks in a bowl, add the honey 1, then add the granulated sugar 2 and whisk with an electric mixer 3 (or a stand mixer)

until you get a light and fluffy mixture 4: it will take at least 10 minutes. In another bowl, gather the flour, cocoa powder 5, and potato starch. Sift the dry ingredients and collect them in the bowl containing the egg mixture 6,
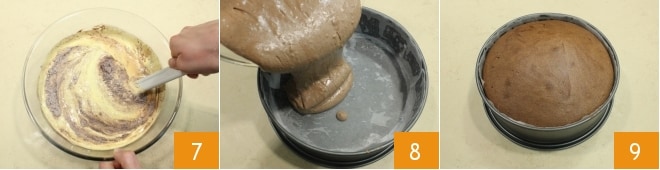
mix with a spoon 7 to combine the ingredients. Pour the mixture into a 9-inch (23 cm) diameter cake pan greased and lined with parchment paper 8. Bake the sponge cake in a preheated static oven at 356°F (180°C) for 45 minutes (if using a convection oven, bake at 320°F (160°C) for 35 minutes). Once cooked, remove the pan from the oven 9 and let it cool before removing the cake from the pan.
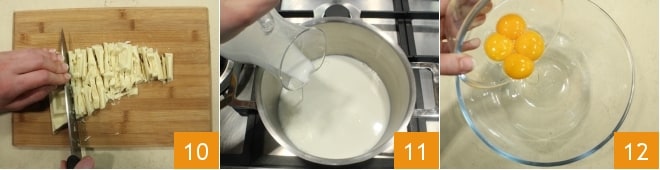
Now focus on the filling: chop the white chocolate 10, then place a saucepan with the milk on the stove 11 and bring it to a boil. Meanwhile, place the yolks in a bowl 12,
add the granulated sugar and mix with a whisk 13 until you get a light mixture, incorporate the sifted flour 14. Pour the resulting mixture into the hot milk 15

and continue stirring 16 as you add the chopped white chocolate 17, continue cooking over low heat until the cream thickens. When the cream is ready 18,
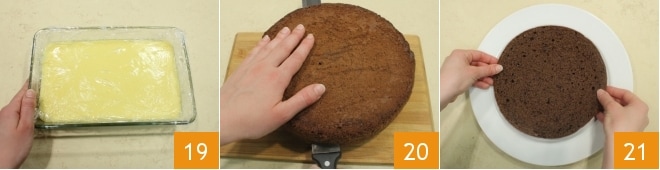
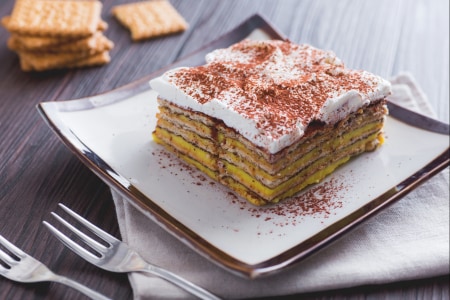
turn off the heat and transfer it to a large glass bowl to let it cool quickly by covering it with cling film in contact with the surface 19. Meanwhile, the sponge cake will have cooled; remove it from the pan and cut it horizontally 20 to obtain 3 layers. Place the base layer on a serving plate 21,
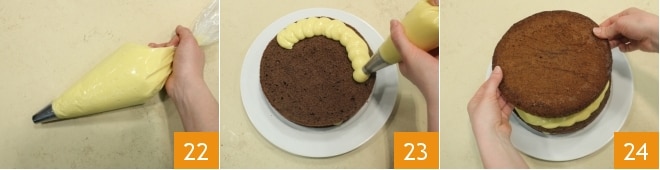
transfer the cold cream into a piping bag with a smooth nozzle 22 and fill the first layer of sponge cake with the cream 23. Cover with a second layer of sponge cake, fill again with the cream, and close with the third layer of cocoa sponge cake 24.
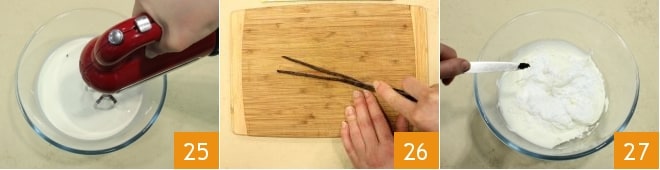
Now focus on the decoration: whip the cream with an electric mixer 25, cut a vanilla pod lengthwise, use a knife to extract the seeds 26 and add them to the freshly whipped cream 27.
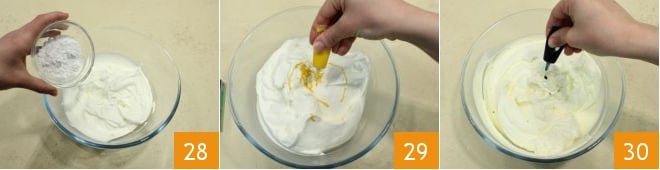
Add the powdered sugar to the cream when it is semi-whipped 30 and then color it with a few drops of yellow food coloring 31 and a few drops of blue food coloring 32 until you achieve an aqua green color.
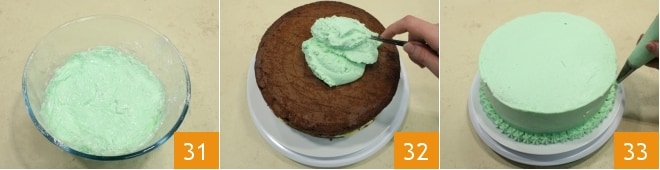
Cover with cling film 31 and let cool in the refrigerator before decorating. When the whipped cream is well set, spread it with a spatula over the entire surface of the cake 32, smoothing it to make it very smooth. Transfer the remaining cream into a piping bag with a star nozzle and create cream tufts at the base of the cake 33
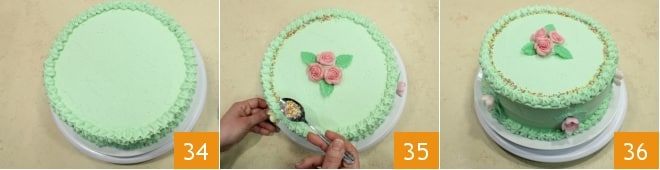
and around the entire perimeter of the surface 34. Take the flower-shaped decorations, apply them to the edge and center of the cake, creating a pretty floral pattern. Take the colored balls and use a teaspoon to distribute a strip around the entire edge 35. Your layered filled cake is ready to be served 36.