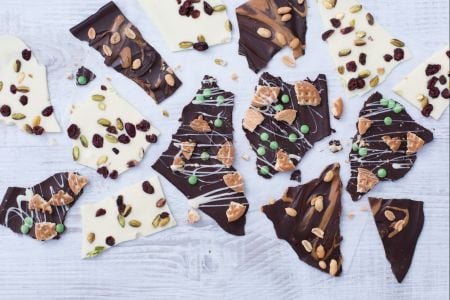
Chocolate bark
The chocolate bark candy are colored chocolate bars to be personalized with the most varied ingredients, ideal to give durgin the holidays.
- Average
- 20 min
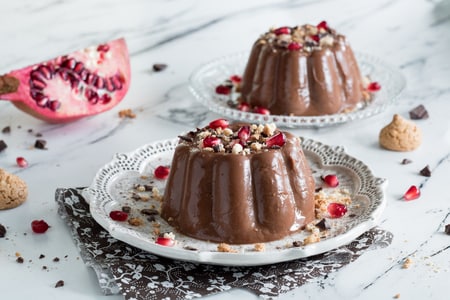
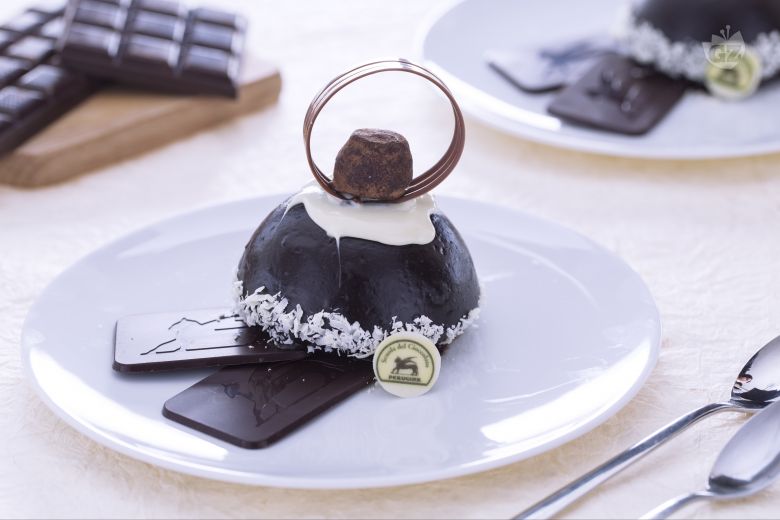
Zuccottini al cioccolato, wow, these little dome-shaped cakes are straight out of Tuscany. And look, they’re what chocolate lovers really dream about. You’ll spot them at fancy parties or when someone wants to really show off their baking skills. What makes zuccottini al cioccolato special? It's all about how everything comes together—tender pan di spagna al cacao (basically cocoa sponge cake, but doesn't it sound fancier?), stuffed with a creamy chocolate custard, and then topped with this super moist, glossy ganache that just makes you wanna dig in right away. Seriously good.
On top, folks in Tuscany finish them with white chocolate flakes and these neat milk chocolate rings, so each one looks pretty spectacular. They’ve got that Italian touch—classic stuff like crema pasticcera inside and the pan di spagna sponge on the outside. These treats are all about layers of soft cake and rich, gooey filling that hit you with a lot of chocolate flavor in a bite-sized, super elegant way. Which is great. In Tuscany, they love making desserts perfect for sharing but still feel special just for you.
The monoporzione (single-serve) thing with zuccottini al cioccolato makes them feel like a mini celebration every time. Compared to the bigger zuccotto, these are way more fun for parties—nobody has to cut slices, you just grab one. You’ll notice that in Italy, especially in the north and central regions, these types of dolci al cioccolato italiani show up a lot around special occasions. And the sauce? The silky chocolate custard inside goes so well with the fluffy cake, and the crunchy flakes on top give each bite a little snap. For real.
If you’re ever curious about ricette tradizionali italiane or need a showstopper dessert, the zuccottini al cioccolato ricetta originale is a really cool place to start. They’re not just good-looking—they’ve got that rich, deep chocolate flavor that sticks with you, and people can’t help but go for seconds when these are around. Plus, they capture the essence of Tuscan baking in every bite. Pretty much.
You might also like:

To make the chocolate dome cakes, start by preparing the sponge cake domes known as "casse": separate the egg whites from the yolks and place them in two separate bowls 1, beat the yolks with half of the sugar 2 until a light and fluffy cream is obtained 3.

Beat the egg whites with a whisk 4 and when they are white, add the remaining sugar to beat them until stiff peaks form 5 (you can also use an electric mixer to beat the eggs). Combine the two mixtures and gently mix with a spatula from top to bottom 6 to avoid deflating them.

Incorporate the sifted flour 7 and cocoa powder 8 into the dough, always mixing gently to keep the mixture well aerated. Baking powder is not necessary in this recipe because the air has already been incorporated by beating the eggs. Transfer the mixture into a disposable piping bag and fill a single-serving silicone dome mold 9 (or a greased and floured aluminum mold). Bake the domes in a preheated static oven at 350°F for 30 minutes (or in a fan oven at 320°F for 20 minutes).

When done, remove from the oven 10, let them cool slightly, and then unmold onto a wire rack and wait until they are completely cold before filling them. Meanwhile, prepare the cream: pour the milk and cream into a saucepan 11 and heat until just below boiling. In a separate bowl, beat the yolks with the sugar 12,

then sift the cornstarch into the egg and sugar mixture 13. Finely chop the dark chocolate and set aside 14. Pour the egg-based mixture you have prepared, mixing well with a whisk 15.

When the cream has thickened, turn off the heat and add the chopped dark chocolate, stirring again to melt it 16. Once the chocolate is completely melted 17, pour the cream into a wide, shallow dish and let it cool to room temperature, covering with plastic wrap 18.

Now take the cold dome cakes, cut a circle one centimeter from the edge and scoop out the inside, removing the dough entirely to create a cavity that you will fill with the filling; part of the removed dough will serve as a cap to seal the dome cakes 19. When the cream is cold, transfer it to a piping bag without a nozzle and fill the dome cakes 20. Seal the dome cakes with the “cap” and place them in the fridge to set. Soften the gelatin sheets in cold water for 10 minutes 21.

In a saucepan, pour milk, cream 22, sugar 23, and cocoa 24. Bring to a boil, stirring with a whisk.

and then add the well-wrung and drained gelatin 25. When the glaze has a temperature not exceeding 90°F (you can measure with a kitchen thermometer), pour it over the dome cakes 25, which you have placed on a wire rack with a plate 26 or a tray underneath (to collect any excess glaze that drips). When it has dried, transfer each dome cake to a dessert plate 27.

To create the decorations, it is necessary to temper the chocolate; this process will not only make the chocolate shiny but will also maintain its qualities in terms of consistency.: melt the milk chocolate in a bain-marie (the water in the saucepan should not touch the bottom of the bowl where you put the chocolate) 1; when the chocolate reaches a temperature of 113-122°F (measure with a kitchen thermometer), pour 2/3 of it onto the marble slab placed on a work surface 2 and start spreading the chocolate on the marble slab with a spatula and a scraper, spreading it over the surface 3. When it reaches 80°F 3, transfer it to the bowl where you left the remaining 1/3 and mix. The chocolate should reach 84°F. If during these stages the temperature drops too much, always keep the bain-marie saucepan with hot water on hand to slightly heat the chocolate. Conversely, if it is still too hot, repeat the operation of spreading on marble with a small part of the chocolate.

Place a sheet of acetate on the work surface and spread the tempered chocolate on top 4, then with a pastry comb create uniform lines 5. Fold the acetate sheet to create a tube 6, leaving the chocolate stripes inside.

Wrap the tube with two rubber bands at both ends 7 and place it in the fridge to set. When it is solid, remove the rubber bands 8 and unroll the sheet 9

extracting the rings that have formed 10. Temper the white chocolate: chop it and melt it slowly in a bain-marie until it reaches 113-122°F. Pour 2/3 of the chocolate onto the marble surface and work the chocolate with a spatula and scraper, mixing it repeatedly 11 until it reaches 79-80°F, then transfer it to a bowl, add the reserved chocolate a little at a time until it reaches 82°F 12.

Distribute the white chocolate on top of the dome of the dome cakes, using a piping bag 13. Then place the chocolate shavings in a bowl and dip the base of the dome cake to make the shavings adhere 14. Place the dome cake on a serving plate and place three milk chocolate rings on top, making them adhere to the white chocolate, which will act as an adhesive 15.

Take a small truffle and squeeze a drop of white chocolate on the bottom 16, then place it on the point of union of the rings 17, next to the dome cake place two dark chocolate sheets. Your chocolate dome cakes are ready to be enjoyed 18.