
Savory Fried Bombs
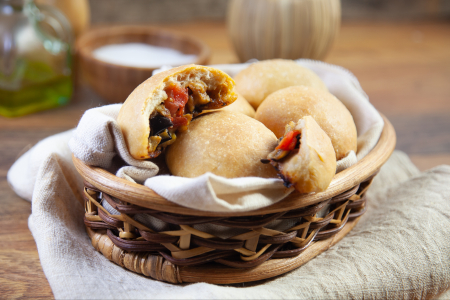
Savory fried bombs are a tasty appetizer: the classic bombs with a soft dough that instead of cream have a filling of mornay sauce.
- Average
- 2 h
Golden, crispy flavor hits right away when families bring out these fried garlic bombs—perfect for sports nights, bigger family get-togethers, or even those simple afternoons where everyone just wants something DELICIOUS with bold flavor. A nice, cheesy garlic snacks look, paired with the soft insides from that garlic-infused dough, means both kids and adults dive in… and it's usually hard to stop at just one. The toasty garlic aroma smells AMAZING when a plate hits the table, while that gooey cheese pulls everyone back for more (this instantly reminds folks of the ballpark or a favorite pub food, only way more fun at home). Rich flavor sits at the heart of these savory bites, and the creamy fried bombs recipe appeals every time there’s a need for party snacks, birthday hangouts, or easy snacks that make people smile. Every batch brings out a nice, golden look with sparks of green from a handful of herbs—families always notice that crispy outside and soft cheesy center, that just tastes so SATISFYING.
Busy home cooks like that fried garlic bombs work for pretty much any occasion—a family movie marathon, lunchbox filler, even quick appetizers before the main meal. Thanks to the clever garlic-infused dough, each cheesy garlic snack delivers both crunch and a little stretch, which keeps everybody grabbing another. Not just for appetizer hour, deep-fried garlic recipes match well alongside burgers, big salads, or simple main dishes (dippers like spicy mayo or ranch make these even more fun). Adaptable for different occasions, these creamy fried bombs please picky eaters but also impress grown-ups with that rich cheese and garlic flavor. The best part: these cheesy garlic snacks usually mean family hangs last longer, because everyone finds reasons to stay around the table for just one more bite. Absolute crowd favorite… really GOOD for anyone craving deep-fried comfort with big flavor and a FUN twist—kind of a new favorite every time. Family dinner, potluck, or snack platter, it all works. Nice for both kids and adults who love garlic, cheese, and a crispy bite they can dip, share, and enjoy together.

To make the fried bombs, start by sifting 3/4 cup of flour into a bowl 1, then dissolve the sugar 2 and dry yeast in 1/2 cup of warm milk and mix with a spoon 3 (alternatively, you can use 0.42 oz of fresh yeast instead of dry yeast).
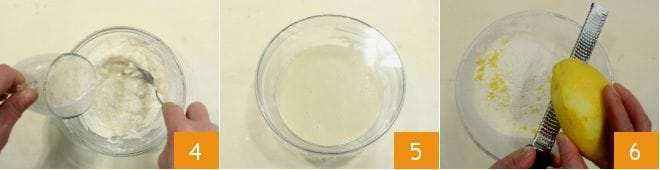
Add the milk and yeast mixture to the flour 4 and mix with a spoon until you obtain a homogeneous batter. Seal the bowl with plastic wrap 5 and let the mixture rise in the oven with the light on for an hour or until its volume has doubled. Meanwhile, sift the remaining flour (3 1/2 cups) into a bowl, add the grated peel of a large lemon 6, and the seeds from a vanilla bean.
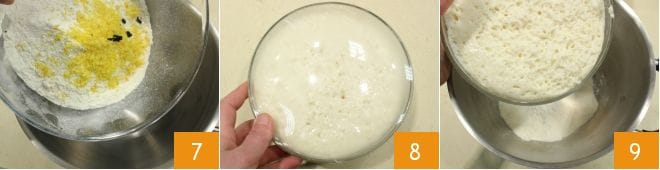
Transfer the mixture to a stand mixer with a paddle attachment 7, retrieve the now-risen batter 8, and incorporate it into the dough 9,
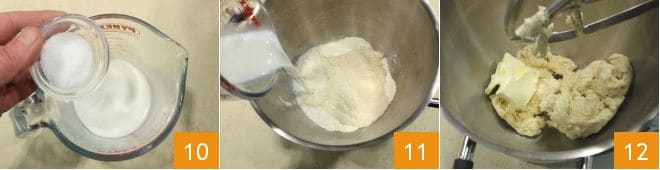
separately dissolve the salt in the remaining 1/2 cup of milk 10 and add it to the dough 11. Turn on the mixer to knead the ingredients. Lastly, add the softened butter 12.
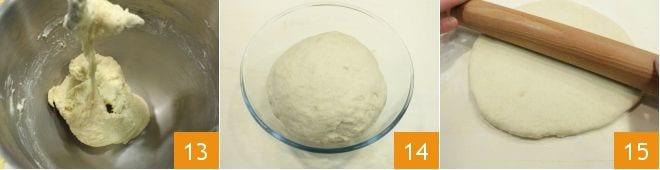
When you have gathered all the ingredients and the mixture detaches from the sides of the bowl 13, knead the dough ball on a floured surface for at least ten minutes until you get a soft, smooth, and elastic dough, form a ball and place it in a bowl that you will seal with plastic wrap and let rise for two hours. After the necessary time has passed, take the bombs dough that will have doubled its volume 14 and gently roll it out with a rolling pin on a floured surface until it is about 1/2 inch thick 15.
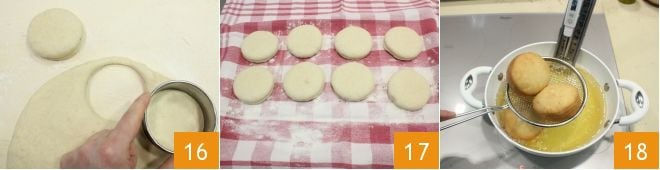
Using a circular cutter (or a glass) about 3 inches in diameter, cut out many discs from the sheet 16, trying to make the most of the dough surface, considering that you cannot knead the leftover scraps together: to avoid wasting them, you can still fry them as they are. Place the obtained discs on a clean, dry, and lightly floured towel, spacing them at least 1 inch apart 17; cover them with a cloth, waiting about 30 minutes for the second rise. After the rising time, you can cook the bombs: one of the secrets to successful fried bombs is the temperature of the oil, which must be hot but not boiling (around 340°F); you could test by frying a piece of dough: if it slowly turns golden, the oil is ready. If the piece of dough darkens too quickly, the oil is too hot and there is a risk that the inside of the bombs will remain raw while the outside burns. Immerse the fried bombs in the oil and cook them until they are golden brown 18,
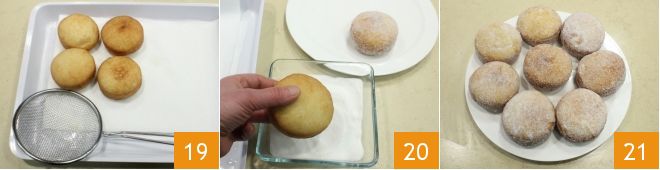
once cooked, drain them and let them drip on a tray covered with parchment paper 19 and then pass them while still hot in plenty of granulated sugar 20, making it adhere to the entire surface. Place the ready fried bombs on a tray and serve immediately 21. If you wish, before rolling them in sugar, you can fill the fried bombs with jam, custard, or chocolate cream, using a pastry syringe.