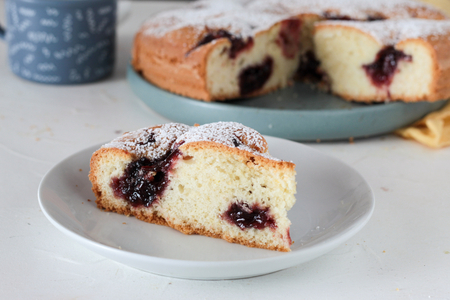
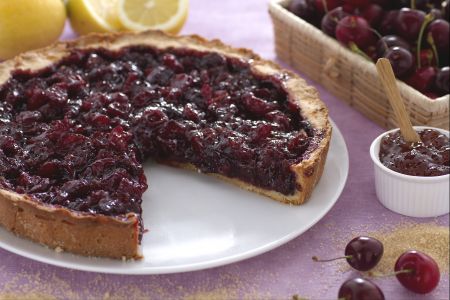
Sour cherry tart
The sour cherry tart is a delicious dessert: a light shortcrust base with a filling of cooked sour cherries and jam. A real treat for the palate.
- Easy
- 1 h 35 min
- Kcal 371
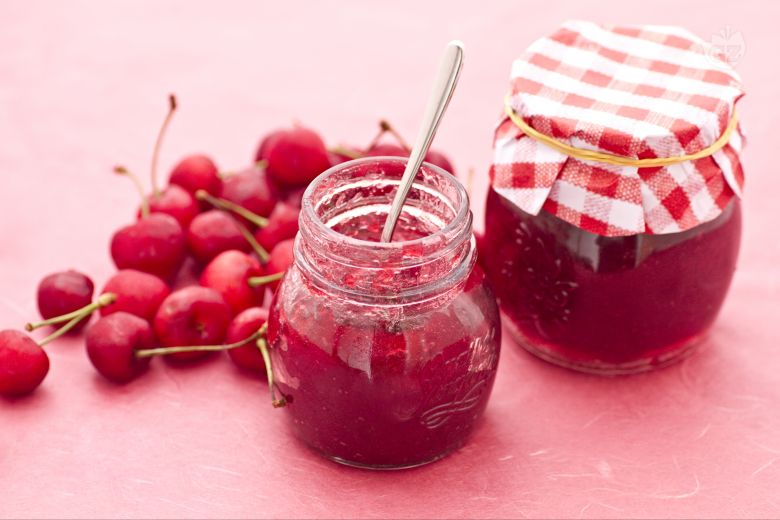
Bright color and sweet flavor make homemade cherry jam an absolute favorite for busy families and home cooks alike. Vivid, jewel-like spread catches the eye every time you open the jar—good-looking on morning toast or layered as a treat in simple desserts. Bursting with the authentic taste of fresh cherries, this fruit jam delivers a nice balance of natural fruit taste and that hint of Summer everyone craves in the colder months. Ripe, deep-red pitted cherries offer a burst of rich jam texture that's not overpowering—just the right amount of smoothness and charm in every spoonful. With every taste, families get reliable results and that feel-good experience of keeping homemade small batch cherry jam on hand, just for them. It works amazingly as classic no pectin cherry jam, letting the cherries shine with naturally low sugar for those who like to keep it simple. Perfect for every season, this cheerful favorite shows up for weekend brunch, lazy holiday breakfasts, or spur-of-the-moment snacks around the kitchen table.
Quick cherry jam serves up lots of GOOD uses that families depend on—including spreading over crispy toast, adding to yogurt, or swirling into oatmeal for a fun twist. No pectin needed for this homemade cherry jam—just honest fruit flavor with comforting soft and spreadable texture that’s never runny or overly thick. Versatility is where this fruit preserve really wins; whether you’re filling pastries, topping cakes, or mixing it straight into cream cheese as a tasty spread, the options are pretty endless. Lots of folks enjoy serving this sweet jam with pancakes for that extra fluffy joy on busy weekday mornings, and it isn’t unusual to see a fresh jar open at family gatherings or neighborhood potlucks. Works great as a reliable flavor boost and stores well on the kitchen shelf for whenever the craving hits. Calling it a kitchen classic isn’t an exaggeration – families usually keep a jar handy because it’s easy, practical, and brings that cozy feeling every time. Honestly, it’s NICE knowing you’ve got a naturally delicious and adaptable jam, ready to brighten up any day at home.
You might also like:
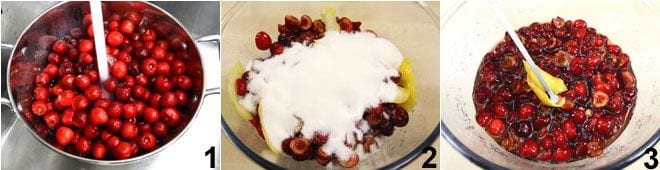
To prepare the cherry jam, start by removing the stems from the cherries. Wash them well 1, then dry them and cut them in half, removing the pit (this will yield about 2.2 lbs of cherries). Place the cherries in a bowl and add the sugar, lemon zest, and 3 tablespoons of lemon juice 2. Cover the bowl with plastic wrap and let it rest for at least 6 hours or overnight in a cool, dry place or in the refrigerator. After this time, remove the lemon zest 3.
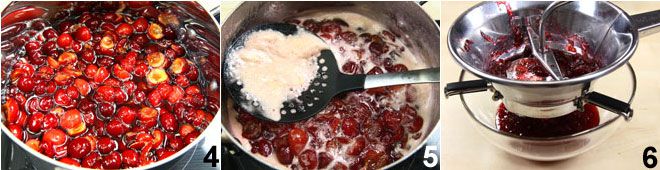
Put the fruit in a large saucepan 4 and cook over medium heat for about an hour, stirring occasionally and removing the foam that forms on the surface with a skimmer 5. While the jam is cooking, focus on sanitizing the jars and lids, as indicated by the guidelines from the Ministry of Health provided at the end of the recipe. Once you've completed this step, return to the jam and check its doneness: it will be ready when, dropping a bit onto a tilted plate, it doesn't run but remains compact, homogeneous, and without streaks. Then pass the jam through a food mill 6. However, if you like fruit pieces, you can leave it as is or process about half. At this point, pour the still hot jam into the sanitized jars, taking care to leave 1/2 inch of space from the jar's edge. Screw the sanitized lids on well but not too tightly and let them cool. The heat of the jam will create a vacuum that will allow the product to be stored for a long time. Once the jars have cooled, check if the vacuum was successful: press the center of the lid, and if you don't hear the typical "click-clack" sound, the vacuum was successful. Your cherry jam is ready to be enjoyed!