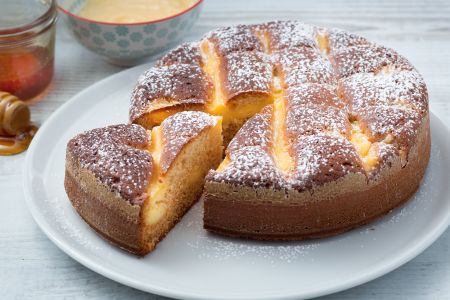

Rice pastiera
The rice pastiera is a variation of the Neapolitan pastiera, the typical Campanian Easter dessert, made with a delicious rice-based filling!
- Average
- 2 h 40 min
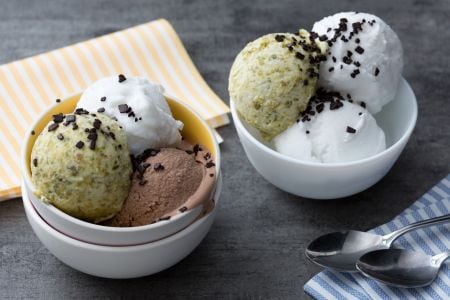
Fior di riso gelato is really something special. I mean, it’s like giving summertime treats a whole new vibe. And look, when the heat cranks up, who wants to deal with an oven? No one, right? In Italy, they’ve got this clever rice gelato thing going on, using rice milk instead of regular dairy. So, not only is it lighter, but it’s super creamy—without the heaviness. People who need something that’s easier on the stomach totally love this kind of Italian rice ice cream. Why? Because rice milk is naturally sweet and skips the lactose. And here’s the deal—fructose replaces regular sugar, offering a healthier twist that still keeps that pleasant summery vibe.
What really stands out is how fior di riso gelato nails that mild flavor. Nothing overpowering—just a nice, gentle taste. Perfect for hot weather. Plus, it’s a sweet treat without all the dairy fuss, fitting right into the way Italian gelato shops keep trying fresh, smart spins on classic desserts.
Now, you throw in some crunchy cialdine wafers—and boom!—you’ve just taken this fior di riso gelato to the next level. These gluten-free wafers? Pretty simple to whip up, and you don’t even need any special tools. They add this fun crispy bite that goes with the soft, moist scoop of gelato—like getting two treats in one. You know, this homemade rice gelato is a hit during Italian summers. Especially for folks who deal with lactose intolerance or gluten issues.
And listen, there are regional spins, too. Some places use local rice varieties or swap the sweetener based on what’s fresh. Compared to other traditional Italian gelato flavors, this one is all about that gentle rice vibe—so you get something smooth and subtle. Not too rich, definitely not overpowering. It totally fits with the Italian way of making desserts that are simple but satisfying. Enjoy a bowl on a hot day? You bet, without feeling weighed down. All in all, this treat feels modern but keeps those roots in Italian summer snacks. Pretty awesome.
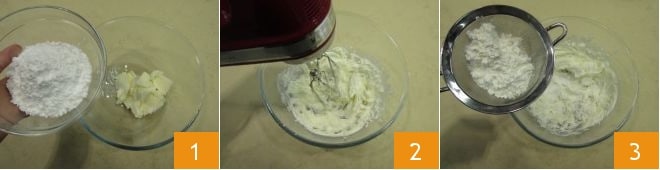
To prepare the rice blossom ice cream, start by making the accompanying wafers. Place room temperature butter in a bowl and add the powdered sugar 1. Begin mixing everything with an electric mixer 2 and add the sifted cornstarch 3 only when you have obtained a well-whipped mixture, then mix everything with a spatula to combine the ingredients.
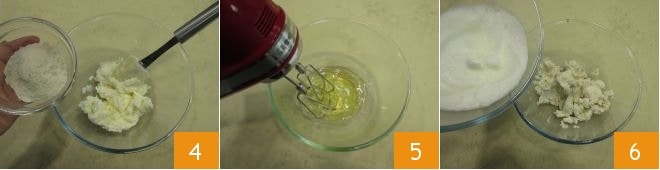
Also add the rice flour 4, previously sifted, and mix again with a spatula. Set aside and beat the egg whites to stiff peaks in another bowl 5, then incorporate them into the previous mixture 6.

Continue mixing with the beater 7 until you obtain a homogeneous batter, then add the seeds from half a vanilla bean 8. To extract them, simply cut the bean and scrape the inside with a sharp knife. Mix once more to incorporate them into the mixture. Line a baking sheet with parchment paper and transfer a tablespoon of batter; to form the wafers, spread it with the back of the spoon to form regular circles with a diameter of 2 inches 9. The layer of batter should be thin but not too thin: if too thick, the wafers will be soft, if too thin, they will darken excessively and break more easily. If you prefer, you can shape your wafers into elongated forms, similar to cat's tongues.
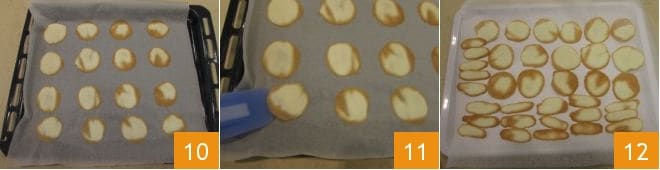
Once all the wafers are formed, bake them in a preheated static oven at 392°F for about 5 minutes (if using a convection oven, bake at 356°F for 3-4 minutes). Once baked 10, let them cool for a few minutes, then lift them with a spatula 11 and transfer them to a tray lined with parchment paper 12.
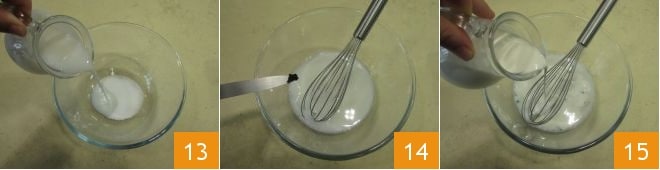
At this point, focus on making the base for the ice cream. Pour the fructose into a bowl and add the rice milk 13, mix with a whisk and add the seeds from the remaining half vanilla bean 14. Also pour in the cream 15 and continue to mix with the whisk.
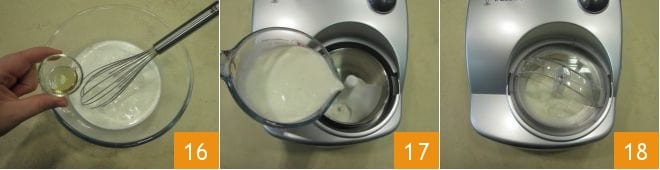
Finally, add the honey 16, mix again, and pour the mixture into the ice cream maker 17. Let the machine run for 30-35 minutes 18 until you obtain a solid and creamy consistency. If you do not have an ice cream maker, place the liquid mixture at room temperature in the freezer inside a bowl, remembering to stir it every half hour until you achieve the perfect consistency.
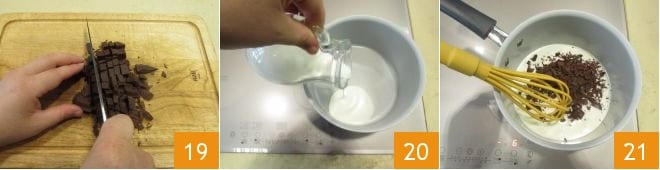
Meanwhile, prepare the chocolate sauce that will garnish your rice blossom ice cream. Coarsely chop the dark chocolate and set it aside 19. Pour the cream into a saucepan 20 and heat it until it almost reaches a boil. Turn off the heat and add the chocolate 21.
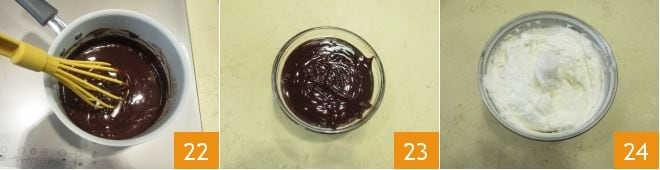
Mix with a whisk until you obtain a smooth and homogeneous sauce 22. Then transfer it to a glass bowl to cool 23. Once the ice cream is ready 24, you can choose to enjoy it immediately or transfer it to a baking dish, cover it with plastic wrap, and store it in the freezer.
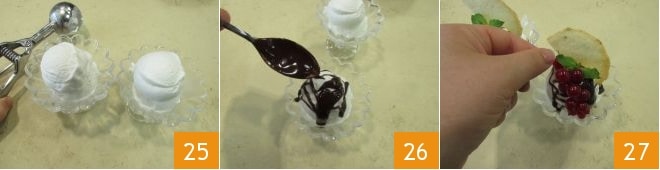
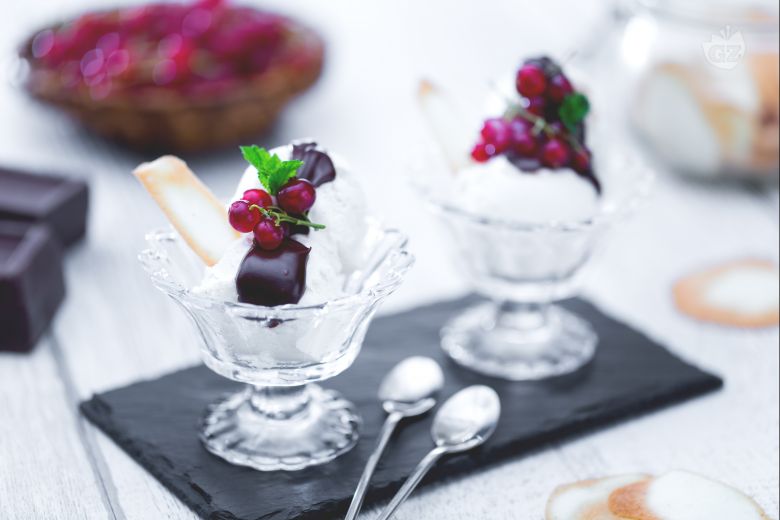
When serving your rice blossom ice cream, use an ice cream scooper to place the scoops in a glass bowl 25, garnish with chocolate sauce 26, and decorate with currants and a mint leaf 27.